writetable
Write table to file
Description
writetable( writes
table T)T to a comma delimited text file. The file
name is the workspace variable name of the table, appended with the
extension .txt. If writetable cannot
construct the file name from the input table name, then it writes
to the file table.txt.
For text and spreadsheet files, each column of each variable in T becomes a column
in the output file. The variable names of T become column
headings in the first line of the file.
For XML files, each column in T becomes an XML node in the output file. The
variable names of T become the names of the element nodes in the
output XML file.
writetable( writes
to a file with the name and extension specified by T,filename)filename.
writetable determines the file format based
on the specified extension. The extension must be one of the following:
.txt,.dat, or.csvfor delimited text files.xls,.xlsm, or.xlsxfor Excel® spreadsheet files.xlsbfor Excel spreadsheet files supported on systems with Excel for Windows®.xmlfor Extensible Markup Language (XML) files
writetable(___, writes
the table to a file with additional options specified by one or more Name,Value)Name,Value pair
arguments and can include any of the input arguments in previous syntaxes.
For example, you can specify whether to write the variable names as column headings in the output file.
Examples
Create a table.
T = table(['M';'F';'M'],[45 45;41 32;40 34],...
    {'NY';'CA';'MA'},[true;false;false])
T=3×4 table
    Var1      Var2       Var3     Var4
    ____    ________    ______    _____

     M      45    45    {'NY'}    true
     F      41    32    {'CA'}    false
     M      40    34    {'MA'}    false
Write the table to a comma delimited text file and display the file contents.
writetable(T)
writetable outputs a text file named T.txt.
type 'T.txt'Var1,Var2_1,Var2_2,Var3,Var4 M,45,45,NY,1 F,41,32,CA,0 M,40,34,MA,0
writetable appends a unique suffix to the variable name, Var2, above the two columns of corresponding data.
Create a table.
T = table(['M';'F';'M'],[45 45;41 32;40 34],...
    {'NY';'CA';'MA'},[true;false;false])
T=3×4 table
    Var1      Var2       Var3     Var4
    ____    ________    ______    _____

     M      45    45    {'NY'}    true
     F      41    32    {'CA'}    false
     M      40    34    {'MA'}    false
Write the table to a space-delimited text file named myData.txt and display the file contents.
writetable(T,'myData.txt','Delimiter',' ')
type 'myData.txt'
Var1 Var2_1 Var2_2 Var3 Var4
M 45 45 NY 1
F 41 32 CA 0
M 40 34 MA 0
writetable appends a unique suffix to the variable name, Var2, above the two columns of corresponding data.
Create a table.
LastName = {'Smith';'Johnson';'Williams';'Jones';'Brown'};
Age = [38;43;38;40;49];
Height = [71;69;64;67;64];
Weight = [176;163;131;133;119];
BloodPressure = [124 93; 109 77; 125 83; 117 75; 122 80];

T = table(Age,Height,Weight,BloodPressure,...
'RowNames',LastName)T=5×4 table
Age Height Weight BloodPressure
___ ______ ______ _____________
Smith 38 71 176 124 93
Johnson 43 69 163 109 77
Williams 38 64 131 125 83
Jones 40 67 133 117 75
Brown 49 64 119 122 80
Write the table, T, to a comma delimited text file, called myPatientData.dat, and display the file contents.
writetable(T,'myPatientData.dat','WriteRowNames',true)
type 'myPatientData.dat'
Row,Age,Height,Weight,BloodPressure_1,BloodPressure_2
Smith,38,71,176,124,93
Johnson,43,69,163,109,77
Williams,38,64,131,125,83
Jones,40,67,133,117,75
Brown,49,64,119,122,80
The first column, which contains the row names, has the column heading, Row. This is the first dimension name for the table from the property T.Properties.DimensionNames.
Convert English dates in a table to German and write the table to file.
Create a table that contains a datetime array with dates in English. Create column vectors of numeric data to go with the dates.
D = datetime({'01-Jan-2014';'01-Feb-2014';'01-Mar-2014'});
D.Format = 'dd MMMM yyyy';
X1 = [20.2;21.6;20.7];
X2 = [100.5;102.7;99.8];
T = table(D,X1,X2)
T =

           D             X1      X2
    ________________    ____    _____

    01 January 2014     20.2    100.5
    01 February 2014    21.6    102.7
    01 March 2014       20.7     99.8
Write the table to a text file. Specify German for the locale of the dates using the DateLocale name-value pair argument, and display the dates in the text file.
writetable(T,'myfile.txt','DateLocale','de_DE');
type myfile.txt
D,X1,X2
01 Januar 2014,20.2,100.5
01 Februar 2014,21.6,102.7
01 März 2014,20.7,99.8
When your data contains foreign-language or non-ASCII characters, use the encoding parameter to ensure the file is written correctly. First, load the provided table into the workspace. Then, write the table to a file using the default encoding. Finally, write the table using 'UTF-8' encoding and examine the result.
Load Table_Japanese_Characters.mat which contains a table T. A preview of the table is shown below. Notice that the table contains two columns with Japanese characters.
load('Table_Japanese_Characters.mat')Write the table to a file. The writetable function uses your system default encoding when writing files. Results may differ based on your system settings. To examine the resulting file, read the table back into the workspace by using the readtable function. Notice that writetable did not succeed in writing columns (1 and 3) containing foreign-language characters.
writetable(T,'myTable.txt')
myTable = readtable('myTable.txt')
myTable=9×3 table
      A        B          C
    _____    ______    _______

    ''     458.98    ''
    ''     530.14    ''
    ''      289.4    ''
    ''      434.81    ''
    ''    186.44    ''
    ''           0    ''
    ''      231.29    ''
    ''      311.86    ''
    ''     239.93    ''
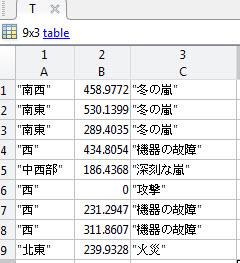
If your table contains foreign-language or non-ASCII characters, you must use the 'Encoding' parameter to ensure your data is written correctly. Set 'Encoding' to 'UTF-8' which supports a wide range of foreign-language and non-ASCII characters. To examine the resulting file, read the table back into the workspace by using the readtable function. With the correct encoding parameter the writetable function is successful in writing the data.
writetable(T,'myTable_UTF8.txt','Encoding','UTF-8')
myTable_UTF8 = readtable('myTable_UTF8.txt','Encoding','UTF-8')
myTable_UTF8=9×3 table
       A         B            C
    _______    ______    ___________

    '南西'     458.98    '冬の嵐'
    '南東'     530.14    '冬の嵐'
    '南東'      289.4    '冬の嵐'
    '西'       434.81    '機器の故障'
    '中西部'    186.44    '深刻な嵐'
    '西'            0    '攻撃'
    '西'       231.29    '機器の故障'
    '西'       311.86    '機器の故障'
    '北東'     239.93    '火災'
Create a table.
T = table(['M';'F';'M'],[45;41;36],...
    {'New York, NY';'San Diego, CA';'Boston, MA'},[true;false;false])
T=3×4 table
    Var1    Var2          Var3           Var4
    ____    ____    _________________    _____

     M       45     {'New York, NY' }    true
     F       41     {'San Diego, CA'}    false
     M       36     {'Boston, MA'   }    false
Write the table to a comma-separated text file named myData.csv and view the file contents. Use the 'QuoteStrings' name-value pair argument to ensure that the commas in the third column are not treated as delimiters.
writetable(T,'myData.csv','Delimiter',',','QuoteStrings','all')
type 'myData.csv'
Var1,Var2,Var3,Var4
"M",45,"New York, NY",1
"F",41,"San Diego, CA",0
"M",36,"Boston, MA",0
Create a table.
T = table(['M';'F';'M'],[45 45;41 32;40 34],...
    {'NY';'CA';'MA'},[true;false;false])
T=3×4 table
    Var1      Var2       Var3     Var4
    ____    ________    ______    _____

     M      45    45    {'NY'}    true
     F      41    32    {'CA'}    false
     M      40    34    {'MA'}    false
Write the table to a spreadsheet named myData.xls. Include the data on the first sheet in the 5-by-5 region with corners at B2 and F6. You can change the worksheet to write to by specifying the index corresponding to the worksheet.
writetable(T,'myData.xls','Sheet',1,'Range','B2:F6')
Excel® fills the row of the spreadsheet from B6 to F6 with #N/A since the range specified is larger than the size of the input table T.
You can write tabular data containing variable names that have any characters, including spaces and non-ASCII characters. Create a table with arbitrary variable names and write the table to a text file. Then, read the tabular data back while preserving the original variable names.
Create a table containing three variables with arbitrary variable names. The first and third variable names contain spaces and non-ASCII characters.
LastName = {'Sanchez';'Johnson';'Li';'Diaz';'Brown'};
Age = [38;43;38;40;49];
Smoker = logical([1;0;1;0;1]);
varNames = {'Last Name','Age','Smoker (1 or 0)'};
T = table(LastName,Age,Smoker,'VariableNames',varNames)T=5×3 table
Last Name Age Smoker (1 or 0)
___________ ___ _______________
{'Sanchez'} 38 true
{'Johnson'} 43 false
{'Li' } 38 true
{'Diaz' } 40 false
{'Brown' } 49 true
Write the data to the file 'sampletable.txt'.
writetable(T,'sampletable.txt')Read the tabular data back using readtable. By default, MATLAB® converts any variable names that include spaces and non-ASCII characters into valid MATLAB® identifiers. For example, MATLAB® converts the variable names 'Last Name' to 'LastName', and 'Smoker (1 or 0)' to 'Smoker_1or0_'. To read the tabular data while preserving variable names, set the 'VariableNamingRule' parameter to preserve.
T_preserve = readtable('sampletable.txt',"VariableNamingRule","preserve")
T_preserve=5×3 table
     Last Name     Age    Smoker (1 or 0)
    ___________    ___    _______________

    {'Sanchez'}    38            1
    {'Johnson'}    43            0
    {'Li'     }    38            1
    {'Diaz'   }    40            0
    {'Brown'  }    49            1
Append data as a new row to the bottom of a table with existing data.
Create a table.
InsectSpecies = {'Monarch Butterfly';'Seven-spot Ladybird';'Orchid Mantis';...
    'American Bumblebee';'Blue Dasher Dragonfly'};
InsectOrder = {'Lepidoptera';'Coleoptera';'Mantodea';'Hymenoptera';'Odonata'};
InsectFamily = {'Nymphalidae';'Coccinellidae';'Hymenopodidae';...
    'Apidae';'Libellulidae'};
PredatoryInsect = logical([0;1;1;0;1]);

T = table(InsectSpecies,InsectOrder,InsectFamily,PredatoryInsect)T=5×4 table
InsectSpecies InsectOrder InsectFamily PredatoryInsect
_________________________ _______________ _________________ _______________
{'Monarch Butterfly' } {'Lepidoptera'} {'Nymphalidae' } false
{'Seven-spot Ladybird' } {'Coleoptera' } {'Coccinellidae'} true
{'Orchid Mantis' } {'Mantodea' } {'Hymenopodidae'} true
{'American Bumblebee' } {'Hymenoptera'} {'Apidae' } false
{'Blue Dasher Dragonfly'} {'Odonata' } {'Libellulidae' } true
Write the table T to a text file called InsectCollection.txt.
writetable(T,'InsectCollection.txt','WriteRowNames',true)
Create new data in the form of a table to add to the existing table.
newInsect = table({'Red-banded leafhopper'},{'Hemiptera'},{'Cicadellidae'},logical([0]))newInsect=1×4 table
Var1 Var2 Var3 Var4
_________________________ _____________ ________________ _____
{'Red-banded leafhopper'} {'Hemiptera'} {'Cicadellidae'} false
Append newInsect to InsectCollection.txt using the 'WriteMode','Append' name-value pair argument.
writetable(newInsect,'InsectCollection.txt','WriteMode','Append',...
    'WriteVariableNames',false,'WriteRowNames',true)
Read the table back into the workspace.
readtable('InsectCollection.txt')ans=6×4 table
InsectSpecies InsectOrder InsectFamily PredatoryInsect
_________________________ _______________ _________________ _______________
{'Monarch Butterfly' } {'Lepidoptera'} {'Nymphalidae' } 0
{'Seven-spot Ladybird' } {'Coleoptera' } {'Coccinellidae'} 1
{'Orchid Mantis' } {'Mantodea' } {'Hymenopodidae'} 1
{'American Bumblebee' } {'Hymenoptera'} {'Apidae' } 0
{'Blue Dasher Dragonfly'} {'Odonata' } {'Libellulidae' } 1
{'Red-banded leafhopper'} {'Hemiptera' } {'Cicadellidae' } 0
Preserve the existing column widths of a spreadsheet file when you append data to the bottom of the file.
Create workspace variables with text data, then create a table as a container for the variables.
state = {'Massachussetts';'California';'Minnesota';'Virginia'};
stateFlower = {'Trailing arbutus';'Golden Poppy';'Pink and White Lady''s Slipper';'Flowering dogwood'};
stateBird = {'Black-capped chickadee';'California Valley Quail';'Common Loon';'Cardinal'};
data = table(state,stateFlower,stateBird);
Write the table to a spreadsheet file named states_funfacts.xlsx.
writetable(data,'state_funfacts.xlsx')Create another table of text data.
t = table({'Maryland';'New York'},{'Black-eyed Susan';'Rose'},{'Baltimore oriole';'Eastern bluebird'}); Append the table to the existing spreadsheet file. Specify 'AutoFitWidth' as false to preserve the existing column widths of the spreadsheet.
writetable(t,'state_funfacts.xlsx',"WriteMode","append","AutoFitWidth",false);

If you specify 'AutoFitWidth' as true instead of false, then writetable will adjust the column widths of the spreadsheet to fit the data to be written instead of preserving the original columns widths.

Edit rows within an existing spreadsheet file without preserving the cell formatting of the spreadsheet.
The spreadsheet file student_grades.xlsx contains formatted cells. All the cells are color-filled and have borders, and the header cells have bold font.

Create a table with text and numeric data.
Student = {'Mary';'John'};
Grade = [95;87];
t = table(Student,Grade)t=2×2 table
Student Grade
________ _____
{'Mary'} 95
{'John'} 87
Update the existing spreadsheet file with the table of input data. Specify 'PreserveFormat' as false to ignore the existing cell formatting of the spreadsheet file. When you do this, student_grades.xlsx is modified in the following way.
writetable(t,'student_grades.xlsx','PreserveFormat',false);

If you specify 'PreserveFormat' as true instead of false when you write the data to the existing spreadsheet file, writetable will preserve the existing cell formatting of the spreadsheet.
writetable(t,'student_grades.xlsx','PreserveFormat',true);

Create a table of data, then write it to an XML file. Customize how writetable writes table data to the XML file by specifying additional name-value arguments.
Create a table of data.
InsectSpecies = {'Monarch Butterfly';'Seven-spot Ladybird';'Orchid Mantis'; ...
    'American Bumblebee';'Blue Dasher Dragonfly'};
InsectOrder = {'Lepidoptera';'Coleoptera';'Mantodea';'Hymenoptera';'Odonata'};
InsectFamily = {'Nymphalidae';'Coccinellidae';'Hymenopodidae'; ...
    'Apidae';'Libellulidae'};
PredatoryInsect = logical([0;1;1;0;1]);

T = table(InsectOrder,InsectFamily,PredatoryInsect);
T.Properties.RowNames = InsectSpecies;
head(T,5)
InsectOrder InsectFamily PredatoryInsect
_______________ _________________ _______________
Monarch Butterfly {'Lepidoptera'} {'Nymphalidae' } false
Seven-spot Ladybird {'Coleoptera' } {'Coccinellidae'} true
Orchid Mantis {'Mantodea' } {'Hymenopodidae'} true
American Bumblebee {'Hymenoptera'} {'Apidae' } false
Blue Dasher Dragonfly {'Odonata' } {'Libellulidae' } true
Write the table T to an XML file called InsectCollection.xml. Specify 'WriteRowNames' as true to write the names of the table rows. The row names appear as fields belonging to the Row element node in the output XML file.
Customize the node names in the XML file by specifying 'Insect' as the value of 'RowNodeName'.
writetable(T,'InsectCollection.xml',"WriteRowNames",false,"RowNodeName","Insect")
Display the contents of the file InsectCollection.xml.
type InsectCollection.xml<?xml version="1.0" encoding="UTF-8"?>
<table>
<Insect>
<InsectOrder>Lepidoptera</InsectOrder>
<InsectFamily>Nymphalidae</InsectFamily>
<PredatoryInsect>false</PredatoryInsect>
</Insect>
<Insect>
<InsectOrder>Coleoptera</InsectOrder>
<InsectFamily>Coccinellidae</InsectFamily>
<PredatoryInsect>true</PredatoryInsect>
</Insect>
<Insect>
<InsectOrder>Mantodea</InsectOrder>
<InsectFamily>Hymenopodidae</InsectFamily>
<PredatoryInsect>true</PredatoryInsect>
</Insect>
<Insect>
<InsectOrder>Hymenoptera</InsectOrder>
<InsectFamily>Apidae</InsectFamily>
<PredatoryInsect>false</PredatoryInsect>
</Insect>
<Insect>
<InsectOrder>Odonata</InsectOrder>
<InsectFamily>Libellulidae</InsectFamily>
<PredatoryInsect>true</PredatoryInsect>
</Insect>
</table>
If you do not specify WriteRowNames as true, writetable skips writing the table row names to the file.

Input Arguments
Name-Value Arguments
Limitations
writetabledoes not support writing nested tables. Usesplitvarson the nested table to split multicolumn variables into single-column variables before writing.
Tips
Creating Empty Sheets in Spreadsheet Files: Create an empty sheet in a spreadsheet file using
writetableby writing an empty table. For example, create an empty sheet named'MySheetName'.Or create three empty sheets calledwritetable(table(),'empty.xls','Sheet','MySheetName')
'Sheet1','Sheet2', and'Sheet3'.writetable(table(),'empty.xls','Sheet',3)
Algorithms
If both the
'WriteVariableNames'and'WriteRowNames'logical indicators aretrue, then thewritetablefunction uses the first dimension name from the propertyT.Properties.DimensionNamesas the column heading for the first column of the output.Excel converts
Infvalues to65535. MATLAB® convertsNaN,NaT,<undefined>categorical values, and<missing>string values to empty cells.For Excel files,
writetablewritestablevariables containingdatetimearrays as Excel dates. If thetablecontainsdatetimearrays with years prior to either 1900 or 1904, thenwritetablewrites the variables as text. For more information on Excel dates, see Differences between the 1900 and the 1904 date system in Excel.There are some instances where the
writetablefunction creates a file that does not representTexactly. You will notice this when you usereadtableto read that file. The resulting table might not have the same format or contents as the original table. If you need to save a table and retrieve it at a later time to match the original table exactly, with the same data and organization, then save it as a MAT-file.writetablewrites an inexact table in the following instances:When writing to text files,
writetableoutputs numeric variables usinglong gformat, and categorical or character variables as unquoted characters.For variables that have more than one column,
writetableappends a unique identifier to the variable name to use as the column headings.For output variables that have more than two dimensions,
writetableoutputs these variables as two dimensional where the trailing dimensions are collapsed. For example,writetableoutputs a 4-by-3-by-2 variable as if its size were 4-by-6.For variables with a
celldata type,writetableoutputs the contents of each cell as a single row, in multiple fields. If the contents are other than numeric, logical, character, or categorical, thenwritetableoutputs a single empty field.
Version History
Introduced in R2013b
See Also
table | readtable | writecell | writetimetable | writematrix