Componentize Large Projects
MATLAB® supports large-scale project componentization by allowing you to reference other projects from a parent project. Organizing large projects into components facilitates code reuse, modular and team-based development, unit testing, and independent release of components.
When you organize a project into smaller projects through project referencing, from a parent project, you can:
Access the project paths, shortcuts, and source control information for all referenced projects.
View, edit, and run files that belong to referenced projects.
Move files between projects in the same project hierarchy.
Renaming, moving, or removing a file in the project hierarchy triggers an analysis and prompts you to update the file usages in the project itself and in all upstream projects in the hierarchy. (since R2025a)
Run a dependency analysis on the current project and all its referenced projects. For more information, see Analyze Project Dependencies.
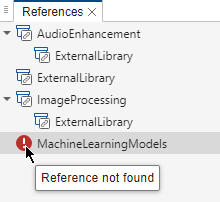
When you open a project, to view all the other projects that the current project references, in the Project toolstrip, in the Environment section, click References. The References tree shows all projects in the hierarchy.
This example project references four other projects.

If the hierarchy has any missing projects or a project that introduces a circular dependency, an icon appears next to the project in the References tree. You can also see the same information listed in the Startup tab in the Project Issues panel. For more information about project startup and shutdown issues, see Run Project Checks.
Add or Remove Reference to a Project
You can add new components to a project by referencing other projects.
To add a reference to a project, follow these steps.
On the Project tab, in the Environment section, click
 References.
In the References tab, click New Reference. Then, select one of the available options.
If the project you want to reference has a well-defined root folder relative to the parent project root folder, select Relative.
If the project you want to reference is in a shared location accessible to your computer, for example, on a network drive, select Absolute.
Browse to select the required project using the PRJ file.
Click Open.
When the referenced project loads, MATLAB adds the referenced project path to the MATLAB search path and then runs or loads specified startup files. Similarly, when the referenced project closes, MATLAB removes the project path from the search path and runs specified shutdown files. MATLAB loads referenced projects before their parent projects. This allows the parent project to access the referenced project in startup and shutdown files.
Tip
You can also populate a referenced project by cloning a project under Git™ source control as a submodule. After cloning the project submodule, add it as a referenced project using the same steps. For more information, see Organize Projects into Components Using References and Git Submodules (Simulink).
To remove a project reference from your project hierarchy, in the References tree, select the referenced project. Then in the References tab, click Remove.
Extract Folder to Create a Referenced Project
You can extract an existing folder in a project to create a referenced project. After extracting a folder, file and folder contents and shortcuts in the referenced project remain accessible from the parent project.
To extract a folder from a project and convert the folder into a referenced project, follow these steps.
In the Project panel, right-click the folder and select Extract to Reference Project.
In the Create Reference Project dialog box, specify a project name and location.
In the Reference type section, select either Relative or Absolute. Select Relative if you specify the new project location with reference to the current project root. Select Absolute if you specify the full path for the new location, which is, for example, on a network drive.
Click OK.
The software removes the selected folder and its contents from the project and creates a new referenced project.
If the folder contains any files associated to shortcuts in the parent project, the shortcuts move to the referenced project and are accessible from the Shortcuts gallery. If any of the files in the folder have labels, the used labels move to the referenced project as well.
View, Edit, and Run Referenced Project Files and Shortcuts
If you have a project that references other projects, you can view, modify, or run the files that belong to the referenced projects directly from the parent project.
To view a referenced project, in the parent project, in the Project tab, click References. Then, in the References tree, select a referenced project.
To modify or run a file, right-click the file and select from the list of available options.
If the referenced project is under source control, to view the source control details, right-click in the white space and select Source Control > View Details.
To access shortcuts of the projects referenced by the open project, in the Project toolstrip, expand the Shortcuts gallery. If you cannot see the referenced projects shortcuts, select the Show project references check box. For information on how to create and edit shortcuts, see Create Shortcuts to Frequent Tasks.

In R2026a: You can also programmatically edit referenced projects without opening them as top-level projects.
Open the top-level project.
mainProj = openProject("MyTopLevelProject");Create a project object for the referenced project.
refProj=mainProject.ProjectReferences.Project;
Edit the referenced project without loading it as a top-level project. For example, add a new file to the referenced project.
addFile(refProj,"newFile.m");