Create a Custom MATLAB Amazon Machine Image (AMI)
You can use an Amazon® Machine Image (AMI) when creating an instance in the cloud. To create a custom MATLAB® AMI, start a machine by using Cloud Center or the MATLAB on Amazon Web Services (AWS) reference architecture on GitHub®. Modify the machine as needed, and then create a new AMI. Use this approach if you want to create a one‑off AMI, for example, to manually install additional software.
If you need to create AMIs regularly, such as to apply the latest updates, use the Packer scripts in the GitHub repository. These scripts allow you to create images in an automated and repeatable way.
Creating an Amazon Machine Image (AMI) also allows you to:
Install drivers, libraries, or other utilities, so that you do not need to reinstall them for subsequent instances.
Share or reuse images. You can share the AMI with others in your organization by tagging it appropriately.
Change instance type easily. If you have already started a machine but need a different instance type with the same software configuration, you can create an AMI and launch a new instance from it.
Reduce storage costs. If you want to save your data without paying for ongoing EBS volume costs, create an AMI and pay only for snapshot storage.
Deploy multiple instances with the same software configuration in your cloud account. You can then share these instances with other users. Ensure that the inbound firewall rules are configured correctly before you share them.
After you create an AMI, you can use it in Cloud Center or in the MATLAB on AWS® reference architecture or any other workflow that accepts a custom AMI.
Create Instance
Start a MATLAB instance in Cloud Center, specifying the MATLAB Version you need. Note
the value of the mw-productid tag if you want to make the image available
in Cloud Center later.
After starting the machine, you can install drivers, libraries, or other utilities to customize your machine image. Then, follow the steps to prepare your cloud machine and create an AMI.
Note
Be careful not to leave your personal data on the image.
Prepare Your Machine
Before creating an AMI, you can follow these recommended steps.
Configure automatic system updates:
Adjust update settings to automatically download updates.
You can also disable any prompts that appear during shutdown. If you disable prompts during shutdown, verify that all updates have been completed and that no warnings are being suppressed that indicate incomplete updates or other issues.
Apply latest system updates:
Check for and install all available system updates. Only use official repositories and trusted sources for updates to prevent introducing malicious or unauthorized software.
Reboot the machine if required to complete the update process.
Remove sensitive information:
Delete saved credentials and secrets from the system, including but not limited to any personal information in Git configuration files.
Remove entries from the credential manager, except those required for virtual apps or device SSO.
Delete any local MATLAB Drive folder.
Sign out of MATLAB and any other applications on your system. For Linux machines, ensure to disable automatic login for MATLAB by removing any stored authentication tokens by using this command on the terminal.
rm -R ~/.MathWorks/mwrefarch
Repeat these steps for any other existing user profiles on the machine.
Create Image
Use the following procedure to create and customize an AMI in the Amazon EC2® Dashboard of the AWS Management Console. Ensure that you have sufficient permission to create the image. Otherwise, contact the administrator of your AWS account.
If you are on Linux, stop the cloud machine and go to the next step. If you are on Windows, you need to follow these extra steps.
In a separate browser window, navigate to the AWS Management Console at
https://console.aws.amazon.com. Select Services > EC2, then click Instances (running). Your instances will include the instance you start in Cloud Center.Select the instance you started in step 1. To find the instance, you can filter your instances by adding:
mw-owner=your_email_address. You can also compare the listed Private IPv4 addresses in the Details pane of a selected machine to that in Cloud Center.In the AWS Management Console select the instance (it might still be selected) and click Actions > Image and Templates > Create Image.
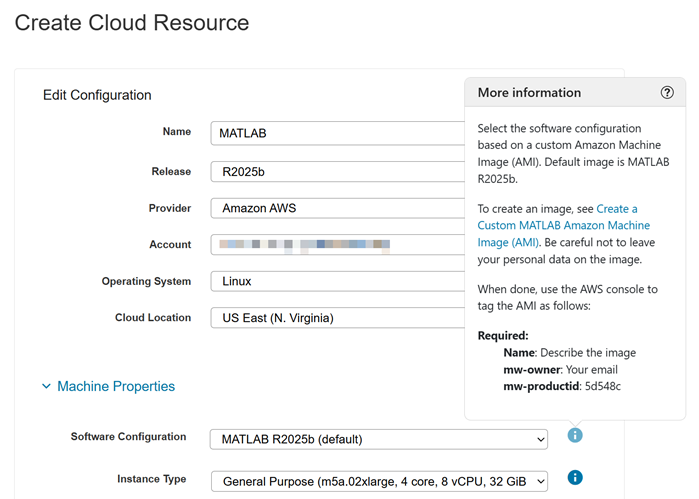
Provide a name and description that will help you identify your new AMI. The image name must be unique across your account and cannot be changed later. Use a name that suggests the MATLAB version, installed libraries or drivers, etc. You can also add tags to help identify this image in the future. You can leave all the other fields empty.
To make the image available in Cloud Center and not just in your AWS account, you must also provide these three tags.
Name: Enter the name of the image that you would like to see in Cloud Center.mw-owner: Enter the email address associated with your Cloud Center. account.mw-productid: Enter the value available in the info icon beside Software Configuration (Optional) parameter in Cloud Center.This ensures that Cloud Center provides the correct input fields when starting the template.
To make the image available for anyone using your Cloud Center account (and not just the owner), you must provide an additional tag.
mw-state:readyIf
mw-stateis set toready, the image is available for anyone with that AWS account linked to Cloud Center.Note
Any user with access to your AWS account can see this AMI in the AWS console even if they have not linked their AWS account to Cloud Center.
Click Create Image.
Users must be in the same account/region combination to use this image. To use the AMI in a different region or in a different AWS account, you can copy the AMI to that region or account. For details, see the AWS documentation on Copy an Amazon EC2 AMI. For more details about creating an AMI, see the AWS documentation on Creating an AMI from an Amazon EC2 Instance.
In Cloud Center, you can now use that AMI when starting a new instance using the Software Configuration (Optional) field.
Ensure that the instance type you want to launch from this AMI is compatible with any specialized drivers or software in the AMI. Ensure also that the instance size is greater than the size of the AMI.
The default AMI is maintained by MathWorks. For the custom images that you own, you are responsible for performing updates on the AMI.