Build Image-to-Image Regression Network Using Deep Network Designer
This example shows how to use Deep Network Designer to construct an image-to-image regression network for super resolution.
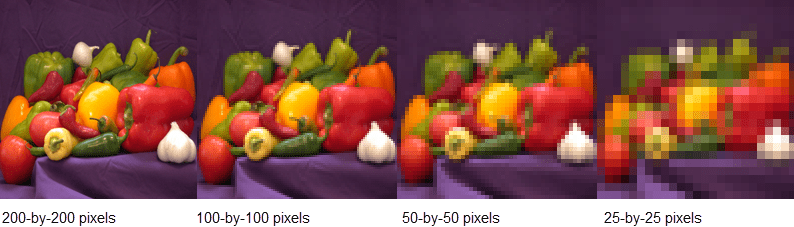
Spatial resolution is the number of pixels used to construct a digital image. An image with a high spatial resolution is composed of a greater number of pixels and as a result the image contains greater detail. Super resolution is the process of taking as input a low resolution image and upscaling it into a higher resolution image. When you work with image data, you might reduce the spatial resolution to decrease the size of the data, at the cost of losing information. To recover this lost information, you can train a deep learning network to predict the missing details of an image. In this example, you recover 28-by-28 pixel images from images that were compressed to 7-by-7 pixels.
Load Data
This example uses the digits data set, which consists of 10,000 synthetic grayscale images of handwritten digits. Each image is 28-by-28-by-1 pixels.
Load the data and create an image datastore.
unzip("DigitsData.zip")

imds = imageDatastore("DigitsData", ...
    IncludeSubfolders=true, ...
    LabelSource="foldernames");
Use the shuffle function to shuffle the data prior to training.
imds = shuffle(imds);
Use the splitEachLabel function to divide the image datastore into three image datastores containing images for training, validation, and testing.
[imdsTrain,imdsVal,imdsTest] = splitEachLabel(imds,0.7,0.1,0.1,"randomized");Normalize the data in each image to the range [0,1]. Normalization helps stabilize and speed up network training using gradient descent. If your data is poorly scaled, then the loss can become NaN and the network parameters can diverge during training.
imdsTrain = transform(imdsTrain,@(x)rescale(x));
imdsVal = transform(imdsVal,@(x)rescale(x));
imdsTest = transform(imdsTest,@(x)rescale(x));
Generate Training Data
Create a training data set by generating pairs of images consisting of upsampled low resolution images and the corresponding high resolution images.
To train a network to perform image-to-image regression, the images need to be pairs consisting of an input and a response where both images are the same size. Generate the training data by downsampling each image to 7-by-7 pixels and then upsampling to 28-by-28 pixels. Using the pairs of transformed and original images, the network can learn how to map between the two different resolutions.
Generate the input data using the helper function upsampLowRes, which uses imresize to produce lower resolution images.
imdsInputTrain = transform(imdsTrain,@upsampLowRes);
imdsInputVal= transform(imdsVal,@upsampLowRes);
imdsInputTest = transform(imdsTest,@upsampLowRes);
Use the combine function to combine the low and high resolution images into a single datastore. The output of the combine function is a CombinedDatastore object.
dsTrain = combine(imdsInputTrain,imdsTrain);
dsVal = combine(imdsInputVal,imdsVal);
dsTest = combine(imdsInputTest,imdsTest);
Create Network Architecture
Create the network architecture using the unet function from Computer Vision Toolbox™. This function provides a network suitable for semantic segmentation that can be easily adapted for image-to-image regression.
Create a network with input size 28-by-28-by-1 pixels.
layers = unet([28,28,1],2,EncoderDepth=2);
Edit the network for image-to-image regression using Deep Network Designer.
deepNetworkDesigner(layers);
Delete the softmax layer.
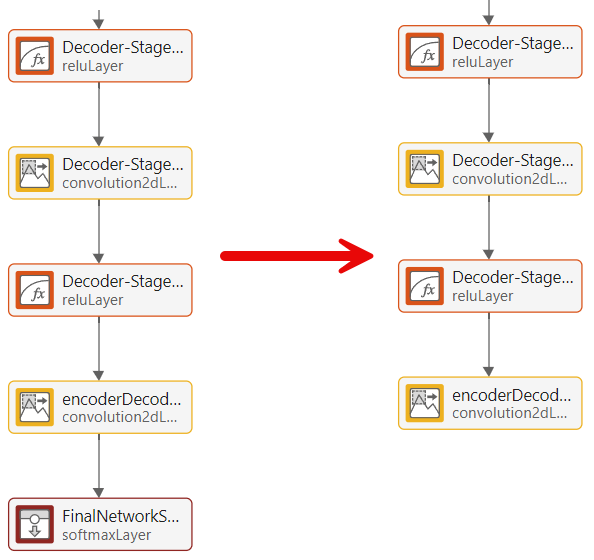
Select the final convolutional layer. Unlock the layer properties so that you can adapt them to your new task. At the bottom of the Properties pane, click Unlock Layer. In the warning dialog that appears, click Unlock Anyway. To adapt this layer to your task, set NumFilters to 1.

To check that the network is ready for training, click Analyze. If the Network Analyzer reports zero errors or warnings, then the network is ready for training. To export the network to the workspace, click Export. The app exports the network as the variable net_1.
Specify Training Options
Specify the training options.
Train using Adam optimization.
Train for 15 epochs.
Validate the network using the validation data.
Display the training progress in a plot.
Disable the verbose output.
options = trainingOptions("adam", ...
    MaxEpochs=15, ...
    ValidationData=dsVal, ...
    Plots="training-progress", ...
    Verbose=false);
Train Neural Network
Train the image-to-image regression network using the trainnet function. For regression tasks, use mean squared error loss. By default, the trainnet function uses a GPU if one is available. Using a GPU requires a Parallel Computing Toolbox™ license and a supported GPU device. For information on supported devices, see GPU Computing Requirements (Parallel Computing Toolbox). Otherwise, the function uses the CPU. To specify the execution environment, use the ExecutionEnvironment training option.
net = trainnet(dsTrain,net_1,"mse",options);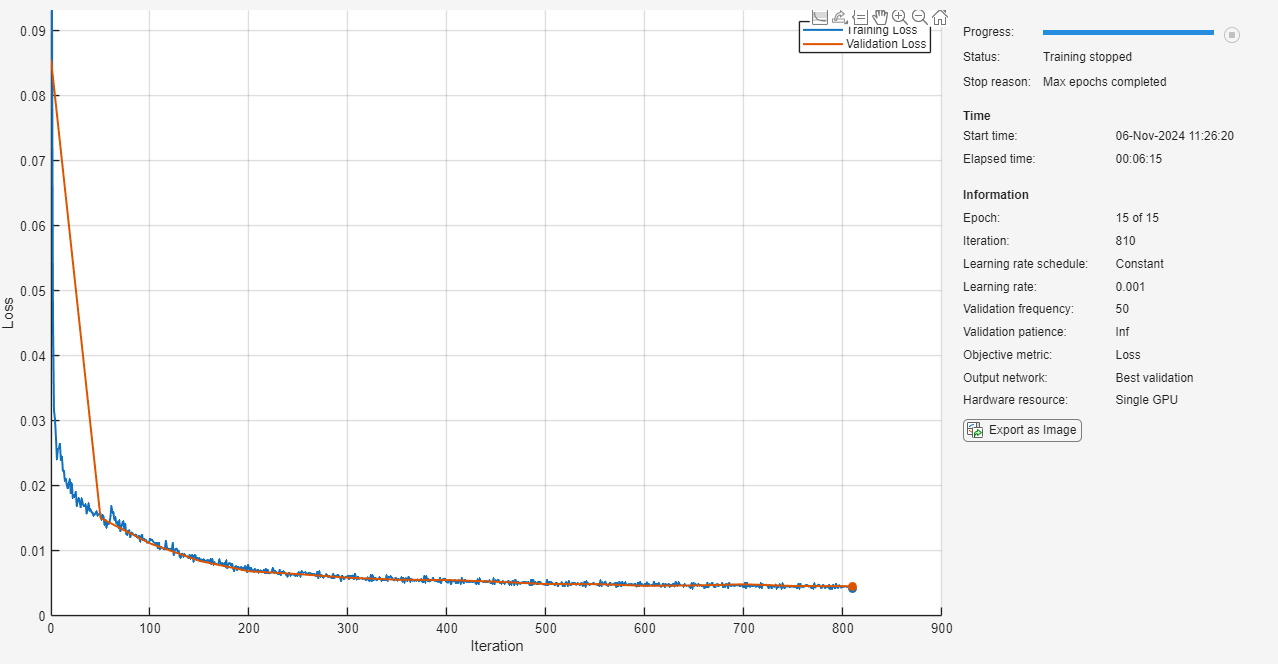
Test Network
Evaluate the performance of the network using the test data.
Make predictions using the minibatchpredict function. By default, the minibatchpredict function uses a GPU if one is available. Using minibatchpredict, you can test if the network can produce a high resolution image from a low resolution input image that was not included in the training set.
ypred = minibatchpredict(net,dsTest);

for i = 1:8
    I(1:2,i) = read(dsTest);
    I(3,i) = {ypred(:,:,:,i)};
end
Compare the input, predicted, and response images.
subplot(1,3,1)
imshow(imtile(I(1,:),GridSize=[8,1]))
title("Input")
subplot(1,3,2)
imshow(imtile(I(3,:),GridSize=[8,1]))
title("Prediction")
subplot(1,3,3)
imshow(imtile(I(2,:),GridSize=[8,1]))
title("Response")
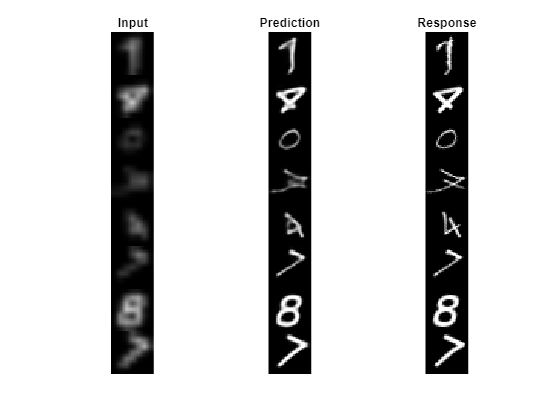
The network successfully produces high resolution images from low resolution inputs.
The network in this example is very simple and highly tailored to the digits data set. For an example showing how to create a more complex image-to-image regression network for everyday images, see Increase Image Resolution Using Deep Learning (Image Processing Toolbox).
Supporting Functions
function dataOut = upsampLowRes(dataIn)
temp = dataIn;
temp = imresize(temp,[7,7],method="bilinear");
dataOut = {imresize(temp,[28,28],method="bilinear")};
end
See Also
Deep Network Designer | trainingOptions