Manage Permissions in Polyspace Access Web Interface
Before you start reviewing the overall quality of a project and investigating findings in your code, create project folders and set permissions to allow or restrict team members access to your projects.
Create a Project Folder
To facilitate the review process, create folders in Polyspace® Access™ to group related results.
Create Folder from the Polyspace Access Interface
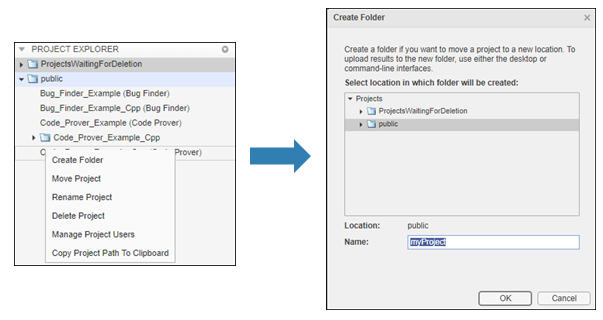
From the Project Explorer in the Dashboard perspective, select any existing folder or project and click Create Folder in the context menu. In the Create Folder window, click an existing folder to create a subfolder. To create a folder at the top of the Project Explorer hierarchy, click Projects.
Create Project Folder at Command Line
To create a folder in Polyspace
Access from the DOS or UNIX® command lines, use the polyspace-access -create-project command. The
polyspace-access binary is available under the
polyspaceroot/polyspace/binpolyspaceroot folder is the Polyspace product installation folder, for example C:\Program Files\Polyspace\R2026a.
For instance, to create myProject under the folder
myRelease, use this
command:
polyspace-access -host hostName -port port -create-project myRelease/myProject
hostNameporthttps://.
If you are unsure about which host name and port number to use, contact your
Polyspace
Access administrator. Depending on your configuration, you might also
need to specify the hostName:port/metrics/index.html-protocol option in the command.
Manage Project Permissions
To set permissions for folders or projects in Polyspace
Access, assign roles to users or groups. The permissions that correspond to
each role are listed in this table.
| Role | Permission |
|---|---|
| No access | No access to the specified folder or project. Set this role to restrict the access of a user or group if:
|
| Reader |
|
| Reviewer |
|
| Contributor |
|
| Owner |
You are the owner of folders that you create and of project results that you upload. You cannot move a folder or project to a new location if a folder or project with the same name already exists at that location. |
| Administrator |
To set a user as Administrator, see Configure User Manager. You cannot move a folder or project to a new location if a folder or project with the same name already exists at that location. |
The user or group roles that you assign for a project folder apply to all the projects and subfolders under that folder. You can also set different user or group roles for each project or subfolder. For instance, you can assign user
jsmithas a contributor for foldermyRelease, and then restrict the access ofjsmithto subfoldermyRelease/update1.Only Administrator or Owner roles can allow or restrict the access of other team members or groups to a project or folder.
Only Administrator roles can assign other users or groups as owners of a project or folder.
Unless you explicitly set a user or group role for a project, the user or group inherit the role of their parent group for that project. For instance, if user
jsmithis not assigned any role for foldermyRelease, andjsmithis a member of a group that is a contributor for foldermyRelease, thenjsmithis also a contributor to foldermyRelease.
By default, all users are members of the Polyspace Access public group and all users inherit the role of that group (Contributor) for the public folder. You cannot change the permissions for the public folder, but you can change permissions for subfolders or projects inside the public folder.
A role is not explicitly assigned if it is inherited from a parent group or a parent project folder.
If you do not explicitly assign a role to a user, and you do not assign role to
the user's parent group, Polyspace acts as if the user has the No access role. Adding
any role via explicit or inherited means takes precedence over the acting
No access role.
Manage Permissions in Polyspace Access Web Interface
From the Project Explorer in the Dashboard perspective, select any existing folder or project and click Manage Project Permissions in the context menu.
The Manage Project Permissions interface opens for the selected project.
To assign or unassign roles, right-click a user or group in any of the panes and select a role.
Select a user or group in any of the panes to see information about the user or group in the Selection Details pane.
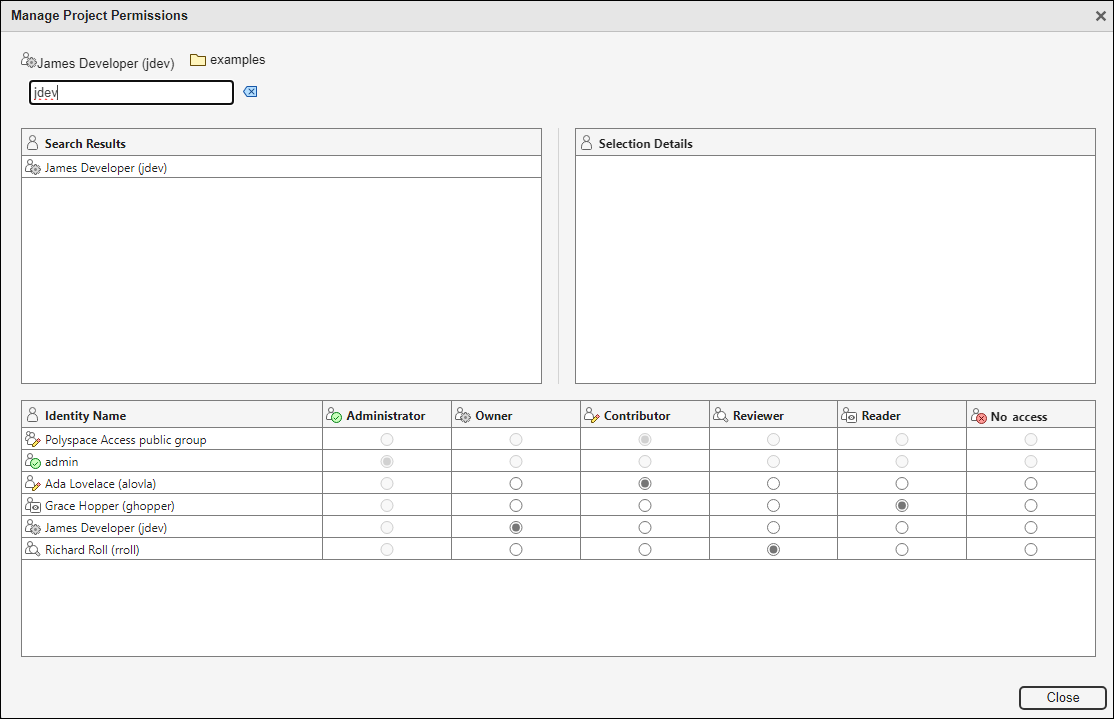
This table provides additional information about the different panes in the Manage Project Permissions interface.
| Pane | Description |
|---|---|
| Search Results | To view a list of user or groups that match your search string, type the user name or group name in the search bar. |
| Selection Details | From any of the other panes, click a user to view the groups that the user belongs to in this pane. If you click a group, this pane shows only
the direct descendant members of the group. For
instance, if group |
Administrator Owner Contributor Reviewer Reader No access |
|
The list of Polyspace
Access users and groups (identities) is populated from the User
Manager database. If an identity is removed from this database
and the identity was assigned a role explicitly on at least one Polyspace
Access project, that identity is highlighted in red in the
Manage Project Permissions interface and is listed by
ID instead of display name, for instance jsmith, instead of
John Smith.
Contact a Polyspace administrator to remove an identity from the Polyspace Access. See Update List of Polyspace Access Users and Groups.
Identities that are deleted from the User Manager database and that do not have roles explicitly assigned to them are removed from Polyspace Access when you refresh your web browser.
Manage Permissions at Command Line
To manage access to uploaded results from the DOS or UNIX command lines, use the polyspace-access -set-role command. The
polyspace-access binary is available under the
polyspaceroot/polyspace/binpolyspaceroot folder is the Polyspace product installation folder, for example C:\Program Files\Polyspace\R2026a.
For instance, to assign jsmith as Contributor for project myProject, use this
command:
polyspace-access -host hostName ^
-set-role contributor -user jsmith ^
-project-path myProject
hostNameporthttps://.
If you are unsure about which host name and port number to use, contact your
Polyspace
Access administrator. Depending on your configuration, you might also
need to specify the hostName:port/metrics/index.html-protocol option in the command.
You cannot assign the Administrator role to a user at the command line.
See Also
Topics
- Upload Results to Polyspace Access (Polyspace Bug Finder)
- Upload Results to Polyspace Access (Polyspace Code Prover)