Link C/C++ Sources and Tests to Requirements
You can link C/C++ sources and tests in the Polyspace Platform user interface to test requirements authored in an external editor such as Microsoft® Word or a requirements management tool such as Requirements Toolbox™ or IBM® DOORS®.
This example shows how to add a link from a test authored in the user interface to requirements authored in any external tool, and navigate from a test to the linked requirement. This workflow does not require a Requirements Toolbox license. If you have Requirements Toolbox installed, you can perform additional tasks such as navigate from requirements to tests or see a traceability matrix with an overview of links between requirements and tests. For more information on the workflow using Requirements Toolbox, see Link C/C++ Sources and Tests to Requirements in Requirements Toolbox.
Initial Setup
You do not require any initial setup for linking from the Polyspace® Platform user interface directly to requirements in PDF, HTML or Word format.
For linking to requirements management tools, you have to set up a link between Polyspace Test™ and those tools:
For linking to requirements in Requirements Toolbox, you have to point to a MATLAB®/Requirements Toolbox installation from Polyspace Test. For more information on the setup and workflow using Requirements Toolbox, see Link C/C++ Sources and Tests to Requirements in Requirements Toolbox.
For linking to requirements authored in the IBM DOORS software, you have to perform a one-time setup. For more information on the setup and workflow, see Link C/C++ Sources and Tests to Requirements in IBM DOORS Software.
Open Outgoing Links Dialog Box
You can create links from sources and tests added to a Polyspace Platform project using the Outgoing Links dialog box. To open this dialog box:
Open a Polyspace Platform project.
On the Polyspace Platform toolstrip, select Parse Code to parse the C/C++ code added to the project. This step is not required if you only want to link from graphical test cases to requirements.
Click the
 button next to a linkable element in a Polyspace Platform project:
In a C/C++ source file, the button appears to the left of each function definition.
In a graphical test case, the button appears next to the Requirements field in the test case header or a test step.
In a C/C++ xUnit test, the button appears on the left of these test creation macros:
PST_SIMPLE_TESTandPST_SIMPLE_TEST_BODY(simple tests)PST_TESTandPST_TEST_BODY(tests that are part of a suite)
Enter Link Information
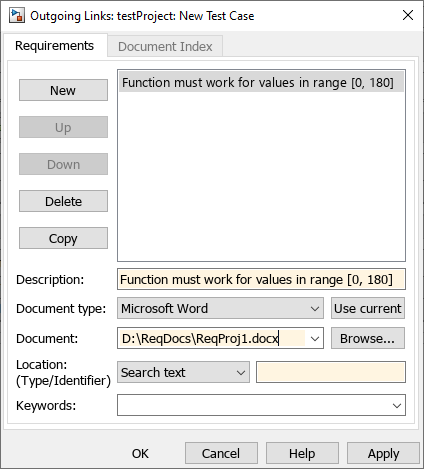
In the Outgoing Links dialog box, click New to create a new link to a requirement. Enter the following information for the requirement link:
Enter a Description and select a Document type (for instance,
Microsoft Word).Follow one of these steps to link to a requirement:
Open the requirements document in your third-party application and select a requirement. For instance, if your requirements are authored in Microsoft Word, open the Word document and select a requirement. Then, in the Outgoing Links dialog box, select Use current.
(Not recommended) Enter a document path for Document and then click Browse to navigate to the requirements document.
Navigate to Requirement Using Links
Once you click Apply or OK in the Outgoing Links dialog box, you see the link appear adjacent to the linkable element. Clicking the link opens the document that contains the requirement.
For instance:
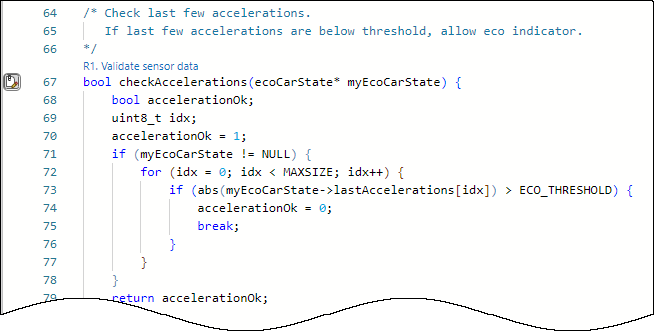
In a source file, the link appears above the function definition.
In a graphical test, the link appears in the Requirements field in the test case header or test step.

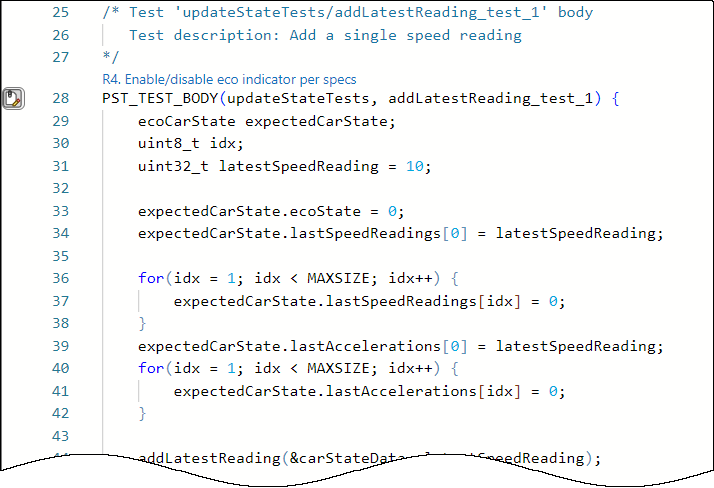
In a C/C++ xUnit test, the link appears above the test creation macro.
Modify or Delete Linked Requirements
To modify or delete linked requirements, reopen the Outgoing Links dialog box as before.
To delete the requirement, click Delete.
To change the requirement, update Description, Document type, or Document as needed.
Management of Links to Requirements
When you save a project, the requirements links associated with tests are saved in a .slmx file in the project folder. If you submit the project to a version control system, you must submit the .slmx file so that requirements links from tests in the project continue to work.
Requirement links associated with an xUnit test file are removed when the test file no longer exists. In particular:
When you remove a test file from the project, the requirement links associated with the test file are also removed.
If you remove a test file from a folder in your file explorer, when you refresh sources in the project, you receive a prompt to remove the associated requirement links. If the file was accidentally deleted, you can keep the requirements. Once you add the file back to your test folder and after you refresh the sources, the requirements links continue to work as before.