Create Roads Around Imported GIS Assets
RoadRunner supports a variety of geographic information system (GIS) formats. You can import GIS assets into RoadRunner and use them as a reference to construct your road network.
In this example, you create roads around imported GIS assets that you download from the U.S. Geological Survey (USGS). The example uses these GIS assets:
| GIS Asset | Description |
|---|---|
| Aerial Imagery | Visual reference for roads and surface texture mapping |
| Point Cloud | Visual reference and object placement information (trees, buildings, markings, and so on) |
| Elevation | Height information about the terrain |
Download and Import GIS Assets into RoadRunner
First you need to download and setup the GIS assets that you want to reference.
Download aerial imagery, elevation, and point cloud data of a specific location from the Basic National Map Explorer Interface at the USGS. For this example, search for Downey, California, a city in the county of Los Angeles. To learn how to download GIS data supported by RoadRunner, see Download GIS Data for Use in RoadRunner.
Open a RoadRunner project and create a new scene by selecting File, then New Scene from the main menu.
To store the imported assets, right-click in the Library Browser and select New, then Folder, and name the folder. For this example, name the folder
GIS.To organize the assets in the
GISfolder, create subfolders for each type of asset:Aerial Imagery,Elevation, andLidarfolders. Move the downloaded assets to the respective folders by dragging the aerial imagery, elevation, and point cloud files into the Library Browser.
For more details on importing assets, see Create, Import, and Modify Assets.
Set World Origin
Now that you have downloaded and stored the GIS assets, set a point of origin around which to apply them in the scene.
To project the GIS assets around a specific geographic position, you use the World Settings Tool
 . For this example, set the world origin
latitude to
. For this example, set the world origin
latitude to 33.9383degrees and the world origin longitude to-118.1296degrees. Click Apply World Changes. The region displayed on the scene canvas defines the area where you load the GIS assets.
You can adjust the region size in which you want to load the assets. With the World Settings Tool selected, use the Extents attribute to change the size of the region.
Add GIS Assets
After you set the origin, load the aerial imagery, elevation, and point cloud data into the scene.
In the Library Browser, navigate to and select the aerial imagery file, making sure that it has a projection. To check the projection of an asset, click the file and in the Attributes pane, check the File Projection (WKT) section.
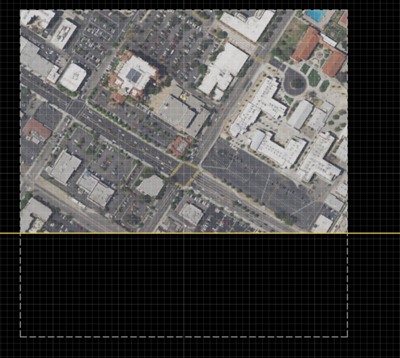
Drag the aerial imagery file into the scene. A rotating orange wheel on the top right of the canvas appears, indicating the loading progress of the file. RoadRunner places the file in the correct world and scene position with respect to the specified World Origin. For example, in this image, the aerial imagery data covers the top portion of the scene.
Similarly, to add the elevation files, drag the files into the scene. Make sure that it has a projection. You can drag multiple files of the same type into the scene editing canvas.
Dragging elevation files into a scene automatically switches RoadRunner to the Elevation Map Tool and adds the appropriate elevation to the scene, projected with respect to the world origin.
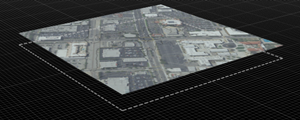
To toggle the visibility of the elevation data, from the View menu, select Elevation Map . RoadRunner provides additional options for toggling the visibility of other GIS asset types.
Elevation Disabled Elevation Enabled 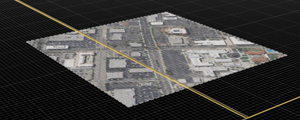
Finally add point cloud data. Check for projection in the File Projection (WKT) attribute. Select multiple files and drag them into the scene. To toggle the visibility of the point cloud data, from the View menu, select Point Cloud.
The point cloud data, as shown by the gray dots, are automatically placed in the correct regions with respect to the world origin.

Customize the point cloud appearance and feature visualization. From the Point Cloud Tool in the Attributes pane, set Color By to Intensity. Then, select Use Custom Intensity and adjust the Intensity Min and Intensity Max values to make the scene more visible. This example shows the difference in intensity when the maximum intensity is reduced from
40000to8000.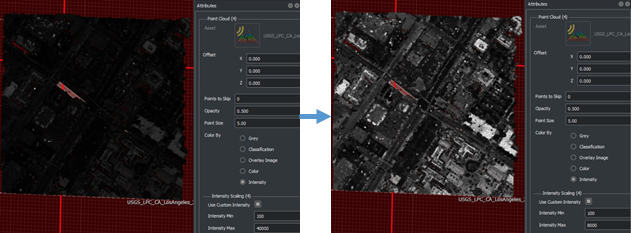
Create Roads Around GIS Assets
After importing the GIS assets, use the tools in RoadRunner to customize the scene.
To build roads around the imported assets, toggle the display of aerial imagery assets. On the View menu, select Aerial Imagery. Then, select the Road Plan Tool
 and draw a road over the existing road
imagery.
and draw a road over the existing road
imagery.
To match the elevation of the road to the imported elevation asset, in the toolbar on the left side of the canvas, click the Project Roads button
 .
.Use the 2D Editor to view and adjust the elevation profile of the road.
For example, these views show the road elevation (red) being adjusted to match the imported elevation data (blue). You can also adjust the point cloud data (green) to match the elevation data.
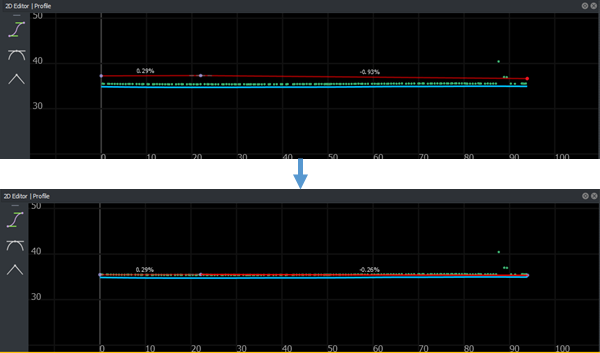
To control the position or height of the road, in the 2D Editor, select the road centers (purple dots) and adjust them to the desired height. To adjust multiple road centers to the same height or position, press Ctrl+A and select the points to maneuver them to the appropriate height or position.
Compare Roads Against Imported GIS Assets
To check the accuracy of road mapping and synchronization, compare the road network that you created with the imported GIS assets data. From the View menu, toggle each GIS asset view on and off by selecting and deselecting Aerial Imagery (F4), Elevation (F5), and Point Cloud (F6).

To further customize the scene, you can use different assets to add 3D models, textures, road signs, stencils, and other data shared by multiple RoadRunner scenes. For more information, see RoadRunner Asset Types.
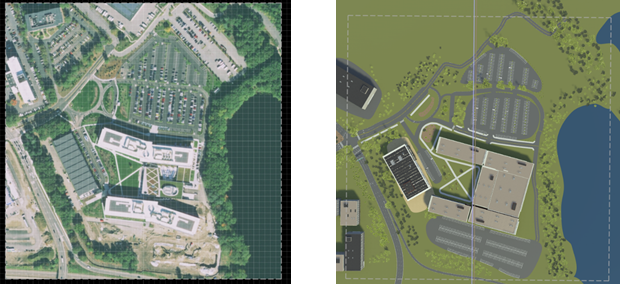
For example, the left scene shows an Aerial Imagery view for a different data set, and the right scene shows the corresponding customized scene. This scene was designed using different tools within RoadRunner to create buildings, roads, parking lots, signboards, trees, and other scene objects.
Create Roads Automatically from HERE HD Live Map Road Data
To automatically generate 3D road models, you can use the add-on product, RoadRunner Scene Builder, which imports and automatically synthesizes 3D road models from HERE HD Live Map.