batteryModuleAssembly
Syntax
Description
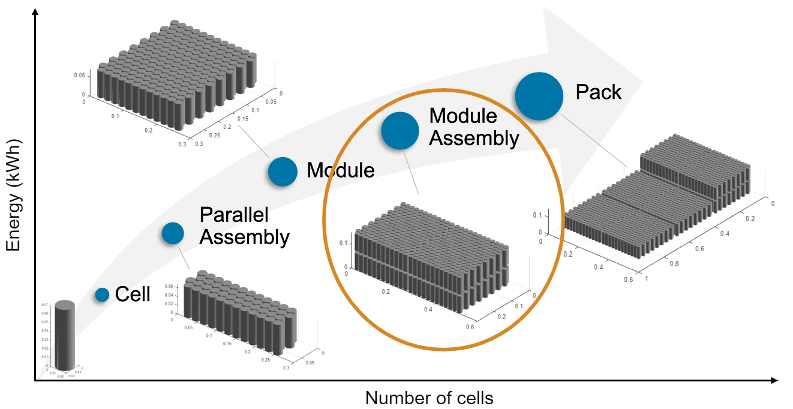
Use the batteryModuleAssembly to create a module assembly object
that represents a number of Module objects
connected electrically in series or in parallel. For more information about the
ModuleAssembly object and its properties, see ModuleAssembly
(object).
moduleassembly = batteryModuleAssembly creates a module assembly
that comprises battery modules with default property values.
moduleassembly = batteryModuleAssembly(
sets the Module)Module property to create a battery module assembly that
comprises one module.
moduleassembly = batteryModuleAssembly(___,
specifies the Name=Value)moduleassembly properties using one or more name-value
arguments. Specify the name-value arguments after all the arguments in any of the previous
syntaxes. For a list of properties, see the Properties
section of the ModuleAssembly object.
For example, create a battery module assembly with two default modules that are connected in series and stacked along the y-axis, with a gap of 0.05 m between each module.
moduleassembly = batteryModuleAssembly(...
    repmat(batteryModule,1,2), ...
    StackingAxis="Y",...
    InterModuleGap=simscape.Value(0.005,"m"));
You can define the number and types of modules in the Module
property. If your module assembly comprises many modules with the same property values, you
can use the repmat function to specify the Module property. Otherwise,
specify an array of distinct modules.
Examples
Create a Cell object with a pouch geometry.
cell = batteryCell(batteryPouchGeometry)
Create a ParallelAssembly object of three parallel cells with the
default topology.
pSet = batteryParallelAssembly(cell,3)
Use this ParallelAssembly object to create a
Module object of 10 parallel assemblies connected in series.
module = batteryModule(pSet,10)
Use this Module object to create a ModuleAssembly
object of four identical modules connected in series.
moduleassembly = batteryModuleAssembly(repmat(module,1,4))
Visualize the module assembly by using a BatteryChart
object.
moduleAssemblyChart = batteryChart(moduleassembly);
Create a Cell object with a Cylindrical geometry and enable the
modeling of its thermal effects.
battCell = batteryCell(batteryCylindricalGeometry);
battCell.CellModelOptions.BlockParameters.thermal_port = "model";
Create a ParallelAssembly object of 30 parallel cells in five rows
with the default topology.
pSet = batteryParallelAssembly(battCell,30,Rows=5);
Use this ParallelAssembly object to create a
Module object of two parallel assemblies connected in series.
module = batteryModule(pSet,2);
Use this Module object to create a ModuleAssembly
object of six identical modules connected in series.
moduleAssembly = batteryModuleAssembly(repmat(module,1,6));
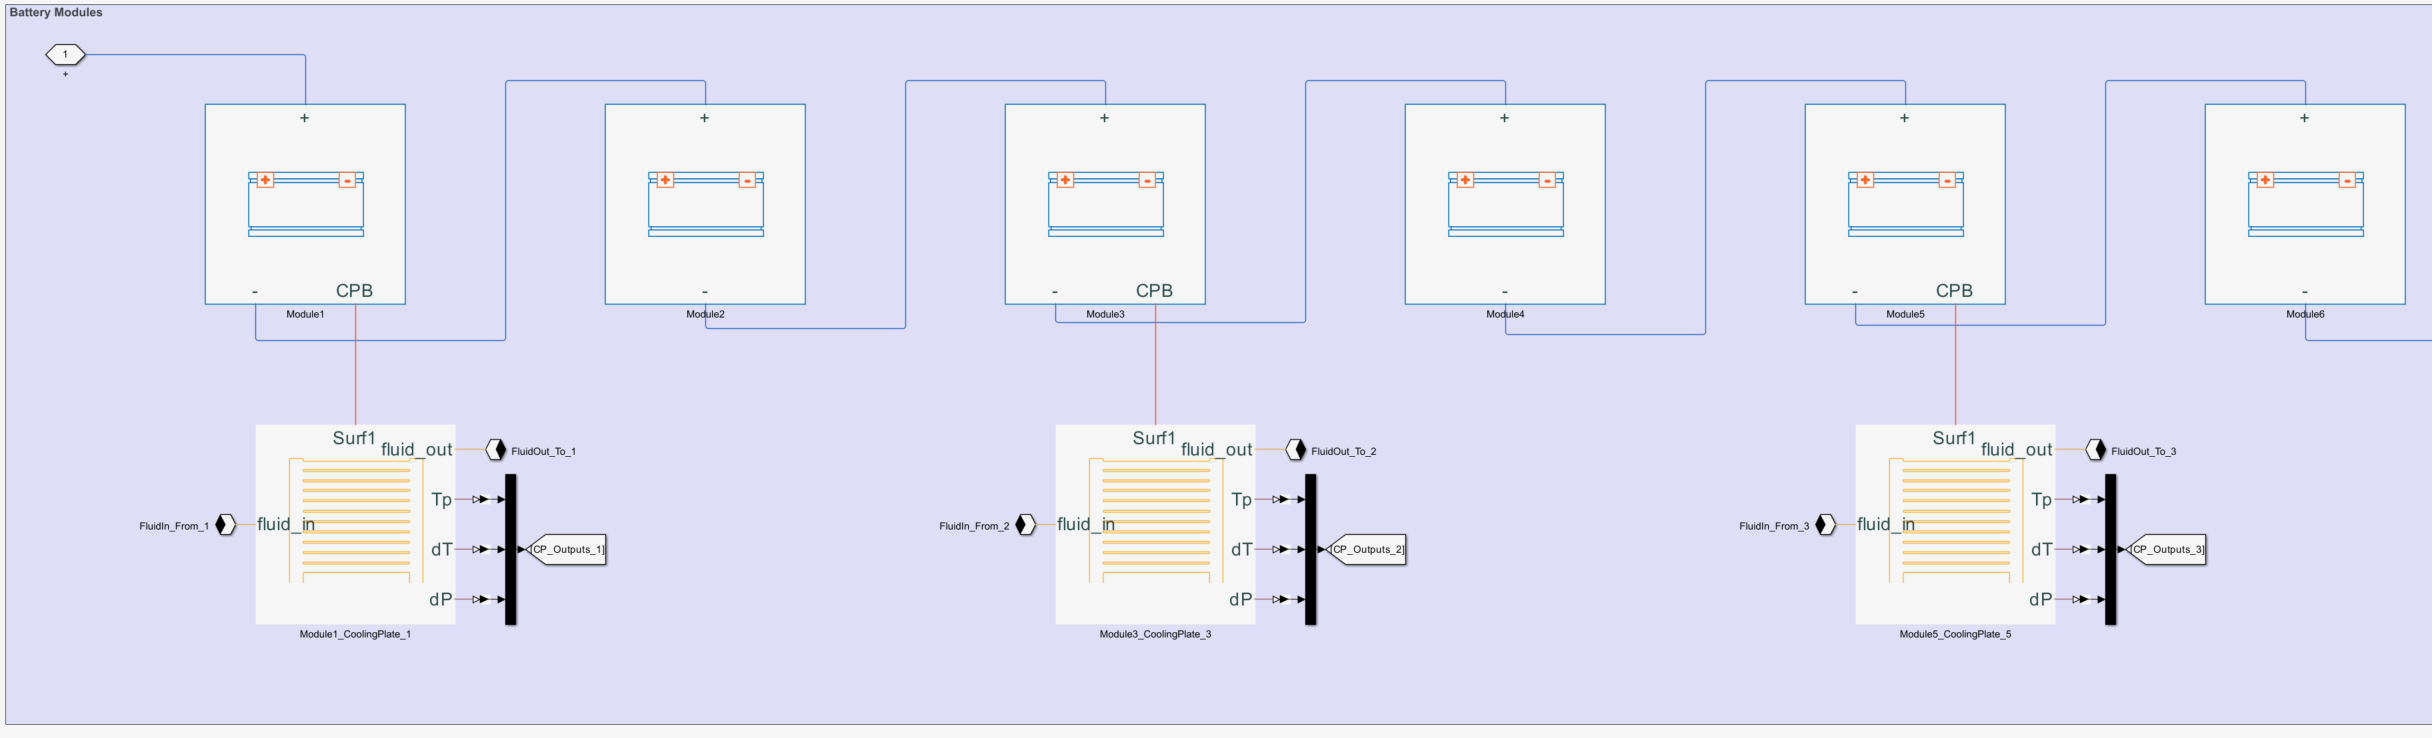
Assign a single cooling plate to the bottom of the module assembly and choose the Parallel Channels block as the cooling plate block.
moduleAssembly.CoolingPlate = "Bottom";
moduleAssembly.CoolingPlateBlockPath = "batt_lib/Thermal/Parallel Channels";
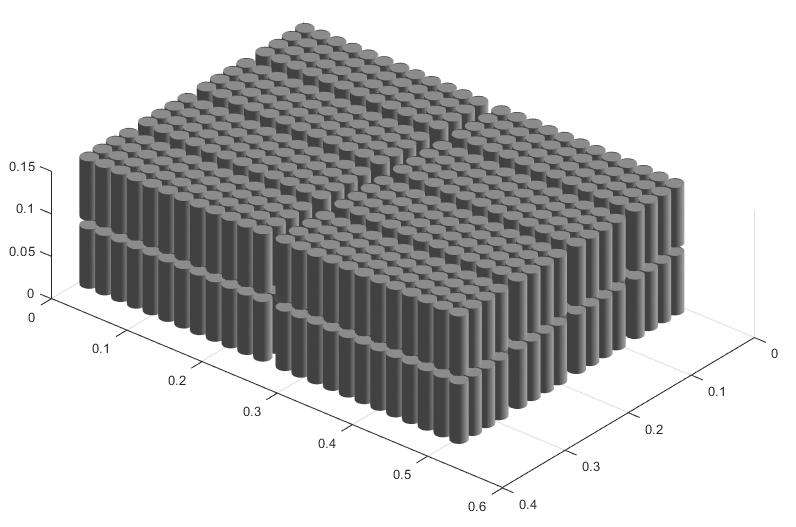
Build this ModuleAssembly object by calling the
buildBattery
function.
buildBattery(moduleAssembly,"LibraryName","Permutation1_SingleBottomCoolingPlate",...
"MaskParameters","VariableNamesByType","MaskInitialTargets","VariableNamesByInstance");
This figure shows the internal structure of the ModuleAssembly object:

Create a Cell object with a Cylindrical geometry and enable the
modeling of its thermal effects.
battCell = batteryCell(batteryCylindricalGeometry);
battCell.CellModelOptions.BlockParameters.thermal_port = "model";
Create a ParallelAssembly object of 30 parallel cells in five rows
with the default topology.
pSet = batteryParallelAssembly(battCell,30,Rows=5);
Use this ParallelAssembly object to create a
Module object of two parallel assemblies connected in series.
module = batteryModule(pSet,2);
Use this Module object to create a ModuleAssembly
object of six identical modules connected in series.
moduleAssembly = batteryModuleAssembly(repmat(module,1,6));
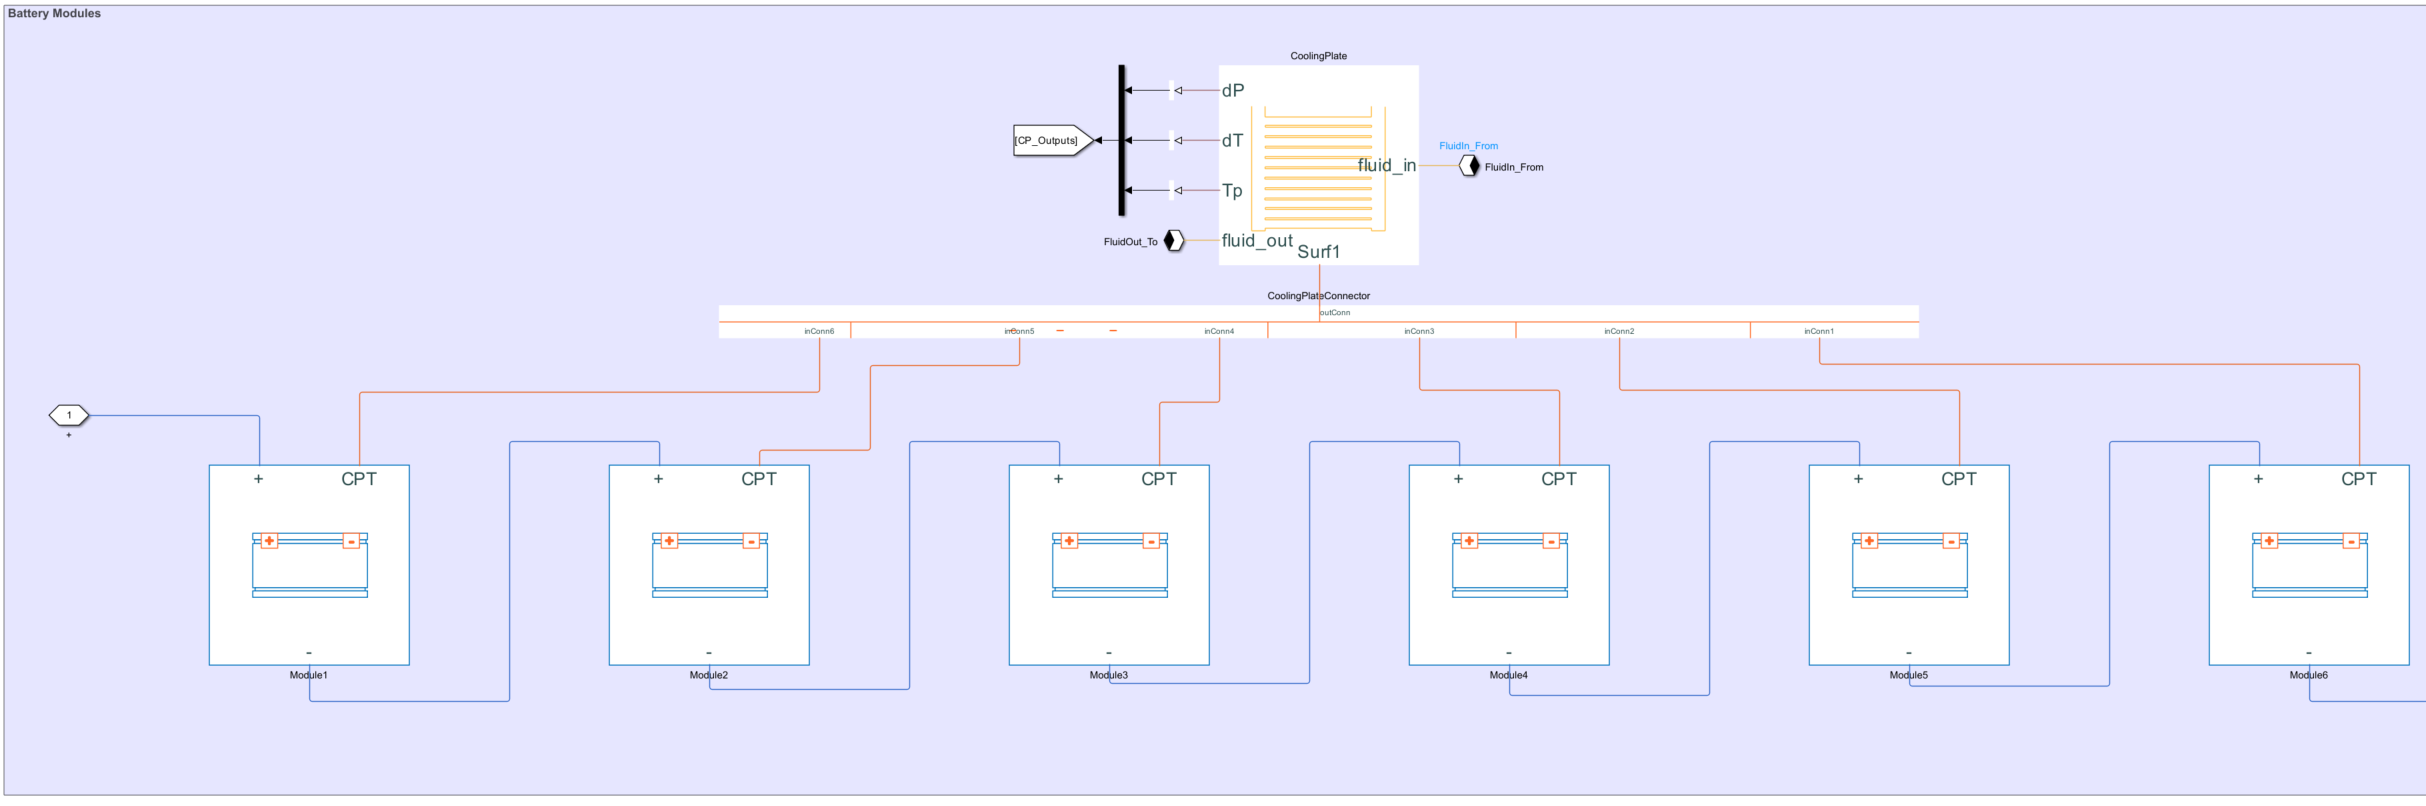
Assign a cooling plate to the bottom of the first, third, and fifth modules inside the module assembly and choose the Parallel Channels block as the cooling plate block.
moduleAssembly.Module(1).CoolingPlate = "Bottom";
moduleAssembly.Module(1).CoolingPlateBlockPath = "batt_lib/Thermal/Parallel Channels";
moduleAssembly.Module(3).CoolingPlate = "Bottom";
moduleAssembly.Module(3).CoolingPlateBlockPath = "batt_lib/Thermal/Parallel Channels";
moduleAssembly.Module(5).CoolingPlate = "Bottom";
moduleAssembly.Module(5).CoolingPlateBlockPath = "batt_lib/Thermal/Parallel Channels";
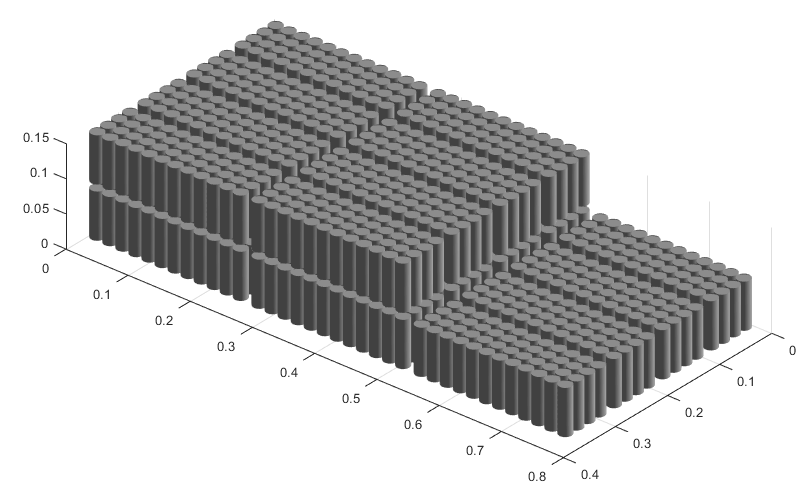
Build this ModuleAssembly object by calling the
buildBattery
function.
buildBattery(moduleAssembly,"LibraryName","Permutation2_ModuleSpecificBottomCoolingPlate",...
"MaskParameters","VariableNamesByType","MaskInitialTargets","VariableNamesByInstance");
This figure shows the internal structure of the ModuleAssembly object:
Create a Cell object with a cylindrical geometry and enable the
modeling of its thermal effects.
battCell = batteryCell(batteryCylindricalGeometry);
battCell.CellModelOptions.BlockParameters.thermal_port = "model";
Create a ParallelAssembly object of 30 parallel cells in five rows
with the default topology.
pSet = batteryParallelAssembly(battCell,30,Rows=5);
Use this ParallelAssembly object to create a
Module object of two parallel assemblies connected in series.
module = batteryModule(pSet,2);
Use this Module object to create a ModuleAssembly
object of six identical modules connected in series.
moduleAssembly = batteryModuleAssembly(repmat(module,1,6));
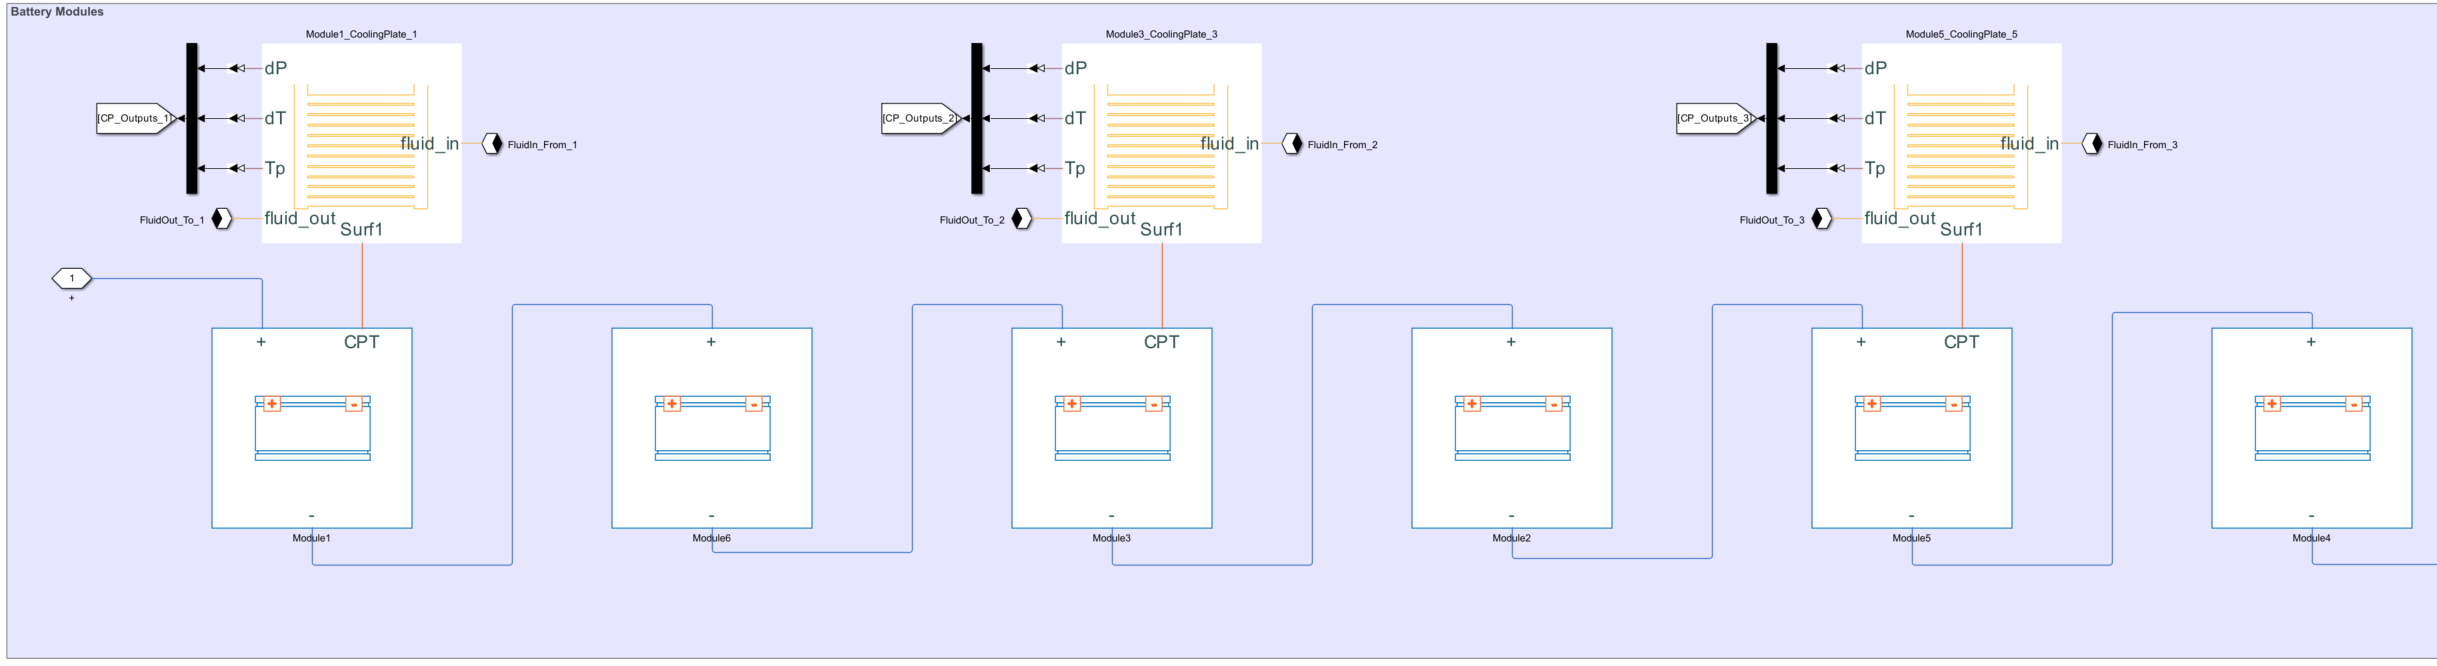
Assign a single cooling plate to the top of the module assembly and choose the Parallel Channels block as the cooling plate block.
moduleAssembly.CoolingPlate = "Top";
moduleAssembly.CoolingPlateBlockPath = "batt_lib/Thermal/Parallel Channels";
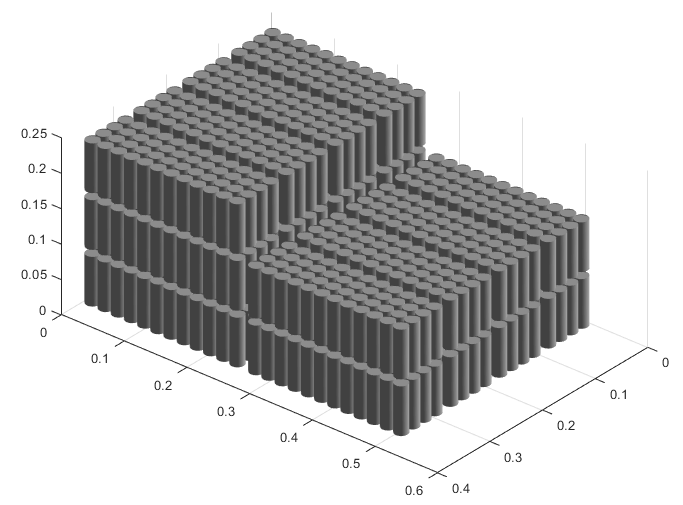
Build this ModuleAssembly object by calling the
buildBattery
function.
buildBattery(moduleAssembly,"LibraryName","Permutation3_SingleTopCoolingPlate",...
"MaskParameters","VariableNamesByType","MaskInitialTargets","VariableNamesByInstance");
This figure shows the internal structure of the ModuleAssembly object:
Create a Cell object with a Cylindrical geometry and enable the
modeling of its thermal effects.
battCell = batteryCell(batteryCylindricalGeometry);
battCell.CellModelOptions.BlockParameters.thermal_port = "model";
Create a ParallelAssembly object of 30 parallel cells in five rows
with the default topology.
pSet = batteryParallelAssembly(battCell,30,Rows=5);
Use this ParallelAssembly object to create a
Module object of two parallel assemblies connected in series.
module = batteryModule(pSet,2);
Use this Module object to create a ModuleAssembly
object of six identical modules connected in series.
moduleAssembly = batteryModuleAssembly(repmat(module,1,6));
Assign a cooling plate to the top of the first, third, and fifth modules inside the module assembly and choose the Parallel Channels block as the cooling plate block.
moduleAssembly.Module(1).CoolingPlate = "Top";
moduleAssembly.Module(1).CoolingPlateBlockPath = "batt_lib/Thermal/Parallel Channels";
moduleAssembly.Module(3).CoolingPlate = "Top";
moduleAssembly.Module(3).CoolingPlateBlockPath = "batt_lib/Thermal/Parallel Channels";
moduleAssembly.Module(5).CoolingPlate = "Top";
moduleAssembly.Module(5).CoolingPlateBlockPath = "batt_lib/Thermal/Parallel Channels";
Build this ModuleAssembly object by calling the
buildBattery
function.
buildBattery(moduleAssembly,"LibraryName","Permutation4_ModuleSpecificTopCoolingPlate",...
"MaskParameters","VariableNamesByType","MaskInitialTargets","VariableNamesByInstance");
This figure shows the internal structure of the ModuleAssembly
object:
Input Arguments
Name-Value Arguments
Specify optional pairs of arguments as
Name1=Value1,...,NameN=ValueN, where Name is
the argument name and Value is the corresponding value.
Name-value arguments must appear after other arguments, but the order of the
pairs does not matter.
Example: batteryModuleAssembly(InterModuleGap=simscape.Value(0.05,"m"))
Note
The properties listed here are only a subset. For a complete list, see the Properties
section of the ModuleAssembly object.
Shortest distance between modules inside the module assembly, specified as a positive scalar or a simscape.Value object that represents a positive scalar with a unit of length. The value of this property must be less than 0.1 m.
If you set this property directly with a positive scalar value instead of using a simscape.Value object, this object converts the value to a simscape.Value object with meter as its physical unit.
Type of electrical connection between modules, specified as either "Series or "Parallel".
Number of levels, tiers, or floors of the module assembly, specified as a positive integer. The value of this property must be equal to or less than the number of modules in the module assembly.
The ModuleAssembly object stacks the modules symmetrically according to the number of levels and modules in the assembly.
For example, this figure shows how the ModuleAssembly object stacks four identical modules when you set this property to 2.
This figure shows how the ModuleAssembly object stacks five identical modules when you still set this property to 2.
This figure shows how the ModuleAssembly object stacks five identical modules when you set this property to 3 instead.
Version History
Introduced in R2024a