Customize PetaLinux Image for AMD Xilinx Devices
This example shows how to customize a PetaLinux® Image for Xilinx® Zynq® UltraScale+™ ZCU111 RFSoC Evaluation Kit. You can use this example to customize a PetaLinux image for any AMD® Xilinx device.
Introduction
PetaLinux is an open-source build system created by Xilinx that streamlines the development process of embedded Linux® systems. It provides a complete software development environment that includes a Linux kernel, device drivers, and user-space applications, as well as tools for building, debugging, and testing embedded Linux systems. PetaLinux is based on the Yocto Project®, which is a collaborative open-source project that provides tools and templates to create custom Linux systems for embedded devices.
Set Up Hardware
Start with a prebuilt PetaLinux image for PetaLinux 2022.1 release.
Open the Xilinx Linux Prebuilt Images for 2022.1 Release page.
Scroll down to the Downloads section.
Download
2022.1_zcu111_release.tar.xz. You must have an amd.com user account to download this image.Extract the
tar.gzfile.Copy
BOOT.BIN, Image, boot.scr, Image.gz, rootfs.cpio.gz.u-boot, system.bit, and system.dtbto the FAT32 partition of the microSD card.Insert the card into the microSD card slot of the board.
Connect the USB-UART port to your computer.
Connect to the serial port terminal on the hardware board by using terminal emulator software, such as Tera Term or PuTTY.
Turn on the board and verify that the Linux boot process finishes.
Get IPv4 address of the board by running the command,
ifconfig eth0, on the Linux serial terminal.
Install PetaLinux Tools
If you already have a Linux desktop set up with PetaLinux tools, go to PetaLinux Workspace Setup.
To customize the pre-built Linux image, you need the PetaLinux tools installed on a Linux desktop.
Set Up Windows Subsystem for Linux
If you are using a Linux development machine, go to the Prepare Linux Desktop.
To prepare the Linux desktop on a Windows® machine, follow the instructions from Microsoft® in Install Linux on Windows with WSL.
To access this Linux desktop follow the instructions in Set up your Linux username and password and create an account.
By default, the Windows subsystem for Linux desktop installs on your Windows system drive. PetaLinux requires around 100 GB of free hard disk space on the ext4 partition. To either move the Linux ext4 virtual hard disk or expand the hard disk space, follow the instructions in manage WSL disk space.
Prepare Linux Desktop
Before you can install the PetaLinux tools, you must prepare the Linux desktop.
See the Prerequisites section of the PetaLinux Tools Documentation.
Set up the host system,
/bin/sh, default shell terminal tobashas shown in the documentation.To install the required software, run the following commands in a terminal from your Linux desktop. These commands require
rootaccess to the Linux desktop.
$ bash
$ sudo apt-get update
$ sudo apt-get install -y -q build-essential sudo tofrodos iproute2 gawk net-tools expect libncurses5-dev tftpd update-inetd libssl-dev flex bison libselinux1 \
 gnupg wget socat gcc- multilib libidn11 libsdl1.2-dev libglib2.0-dev lib32z1-dev libgtk2.0-0 libtinfo5 xxd screen pax diffstat xvfb xterm texinfo gzip unzip \
 cpio chrpath autoconf lsb-release libtool libtool-bin locales kmod git rsync bc u-boot-tools python  && apt-get clean && rm -rf /var/lib/apt/lists/*
$ sudo dpkg --add-architecture i386 && sudo apt-get update &&  DEBIAN_FRONTEND=noninteractive sudo apt-get install -y -q zlib1g:i386 && sudo apt-get clean
3. Reboot the Linux desktop after running the commands.
Download and Install PetaLinux
Open the Xilinx Downloads Page for 2022.1 Release page.
In Archive, select 2022.1.
Download the
PetaLinux 2022.1 Installer. You must have an amd.com user account to download this installer.Follow the PetaLinux Tools Documentation to install PetaLinux.
Do not use the
sudocommand to install PetaLinux as a root user.Note the PetaLinux tool installation folder.
After the installation is complete, verify that you can source the PetaLinux tools using these commands. Replace the path
/home/userwith your PetaLinux tools installation folder.
source /home/user/petalinux/settings.sh
echo $PETALINUX
The echo command returns the full path to the PetaLinux tools installation folder, /home/user/petalinux.
Set Up PetaLinux Workspace
If you already have a PetaLinux project for the Xilinx Zynq UltraScale+ ZCU111 RFSoC Evaluation Kit, skip to Customize PetaLinux Image.
Open the Xilinx Downloads Page for 2022.1 Release page.
In Archive, select 2022.1.
Scroll down to Zynq UltraScale+ MPSoC Board Support Packages - 2022.1 section.
Download the board support package, ZCU111 BSP. You must have an amd.com user account to download this board support package.
Open a terminal on the Linux desktop and source the PetaLinux tools.
Create a PetaLinux project from the BSP by using the following commands, but replace the
/home/user/Downloadsfolder with your download path of the BSP.
source /home/user/petalinux/settings.sh
petalinux-create --type project --source /home/user/Downloads/xilinx-zcu111-v2022.1-04191534.bsp
Customize PetaLinux Image
Start the OS Customizer app by entering the following command in the MATLAB® command window:
oscustomizer
Board Connection
In the OS Customizer, enter the device address, username, and password to connect the board to the host using SSH2. The default password for the pre-built ZCU111 RFSoC Board Linux image is
xilinxand username isxilinx.Click Connect.
Click Next. The next screen starts introspecting the Linux image.
Linux Image Introspection
TheIdentify SoC Blockset Features screen shows the list of features that require additional customization on the Linux image.Click Next.
Image Backup
For this example, you have downloaded the pre-built PetaLinux image, so backup is not necessary.
Select the Skip backup option and click Next.
However, backing up the microSD card prevents data loss. To back up the image, turn off the board, remove the microSD card from the board, insert it into the card reader of your computer, and follow the Back up Embedded OS Image instructions.
PetaLinux Environment Configuration
The Set Up and Configure the Build Environment screen in the OS Customizer provides a brief overview of your PetaLinux installation and workspace setup.
Download the
meta-mathworksYocto layer.Open the PetaLinux configuration menu and add the full path to the
meta-mathworks.Alternatively, use following commands to automate these instructions.
source /home/user/petalinux/settings.sh
cd /home/user/petalinux/zcu111-rfsoc
git clone https://github.com/mathworks/meta-mathworks -b petalinux-v2022.1
echo CONFIG_USER_LAYER_0=\"/home/user/meta-mathworks\" >> /home/user/petalinux/zcu111-rfsoc/project-spec/configs/config
petalinux-config --silentconfig
Custom Configurations and Recipes
By default, the meta-mathworks user layer overrides the default Linux kernel recipe and replaces the Linux kernel with the MathWorks Linux kernel. To preserve settings from a previously configured project, copy your custom Linux kernel configuration changes (.cfg files) from
<petalinux-project-folder>/project-spec/meta-user/recipes-kernel/linux/linux-xlnx to
meta-mathworks/recipes-kernel/linux/linux-xlnx.
Copy custom recipes or packages from <petalinux-project-folder>/project-spec/meta-user/recipes-core/images/petalinux-image-minimal.bbappend to
meta-mathworks/project-spec/recipes-core/images/petalinux-images-minimal.bbappend.
Add Custom Applications to PetaLinux Image
To include your custom applications in a PetaLinux image, follow these steps:
1. Add your application recipe:
Place your custom application recipes in the recipe-apps folder of your PetaLinux project.
For example, if you have a recipe named myapp containing myapp.bb, place it in this directory: <petalinux-project-folder>/project-spec/meta-user/recipes-apps/.
2. Update the root file-system configuration:
Add your application to the root file-system configuration files to ensure it is included in the image.
Edit
<petalinux-project-folder>/project-spec/configs/rootfs_config and add CONFIG_myapp=y.Edit
<petalinux-project-folder>/project-spec/meta-user/conf/user-rootfsconfig and add CONFIG_myapp.
Add Software Packages
Follow the instructions on the OS Customizer screens to add software packages and libraries required by the SoC Blockset™ features.
Kernel Profiler
Add LTTng software packages to the
petalinux-image-minimal.bbappendrecipe.To view the LTTng trace information, add
babeltracesoftware package.Click Next.
Device Drivers
Add
libiiosoftware and related dependencies in the PetaLinux image recipe.Modify the root file-system configuration and add the
libiio, libserialport, and libusb1packages.Click Next.
Task Execution Profiling
Task execution profiling requires use of boost libraries.
Add
boostlibraries in the PetaLinux image recipe and root file-system configuration.Click Next.
Device Tree Compiler
SoC Builder generates device tree on the hardware board using dtc (device tree compiler) software.
Add
dtcin the PetaLinux image recipe and root file-system configuration.Click Next.
Build PetaLinux Image
After modifying the PetaLinux configuration for the Linux kernel and root file-system (rootfs), build the image using the petalinux-build command. The build takes around 30 to 45 minutes, depending upon the memory and CPU cores of the Linux desktop.
After the build completes, create the BOOT.BIN and other bootloader artifacts using the petalinux-package command. The images are generated in /home/user/petalinux/zcu111-rfsoc/images/linux folder.
To copy the new image, follow the instructions in the Manual Embedded OS Image Build screen.
Verify Generated PetaLinux Image
To verify the Linux image, follow the example in Triggering Software Tasks by FPGA Interrupts.
Run the generated software model soc_hwsw_interrupt_sw in external mode. From the model toolstrip, open the Simulation Data Inspector and add interruptTask1 in the top view and interruptTask2 into the bottom view.
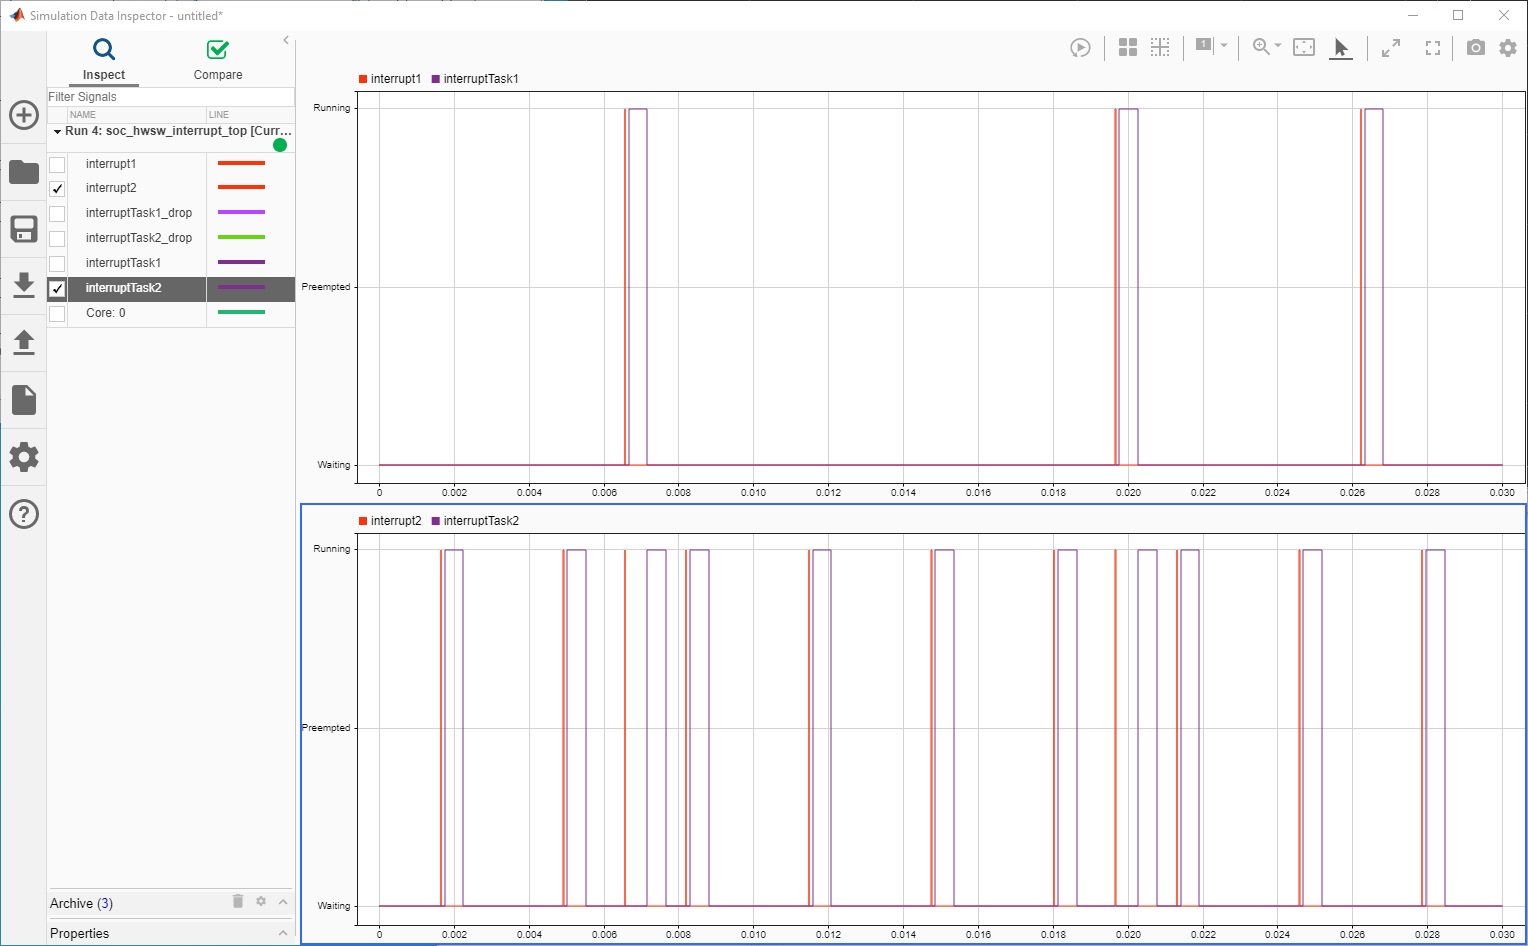
Every time the simulation triggers an interrupt, observe that it executes the corresponding task.