GestureLogger
GestureLogger
Table of Contents
- GestureLogger
- Table of Contents
- Purpose
- Installation
- Usage
- Known Bugs
- Extension
- TODO
Purpose
This application has been built to make the creation of hand-gesture datasets easier. It facilitates the asynchronous setup, capture, annotation and export of this data, with the use of WebXR enabled VR headsets as the capture device.
Modern VR headsets have the ability to record the hand-skeletal data of the user. This tool harnesses that capability to make capturing hand data easy. Simply:
- Define your gesture classes (clap, grip, etc.)
- Create trials which include multiple gestures
- Push trials to specific participants on the server
- Asynchronously download these trials from the server after the participant has performed them on their VR headset
- Annotate the captured data in batches
- Export the captured data to a dataset
Installation
You can install and run a version of this app through the standalone installer: releases
You can also run this by cloning the repository
$ git clone https://github.com/Saatvik-Lochan/GestureLogger.gitand opening Login.mlapp with MATLAB.
Usage
The usage of this application is split into three main parts:
There are some notes that might come in useful. Additionally you can see the export format and the gesture annotator.
Hosting servers
It is recommended that you host your own servers:
-
WebGestureCapture
is the frontend that serves the pages on which the participants perform
the gestures
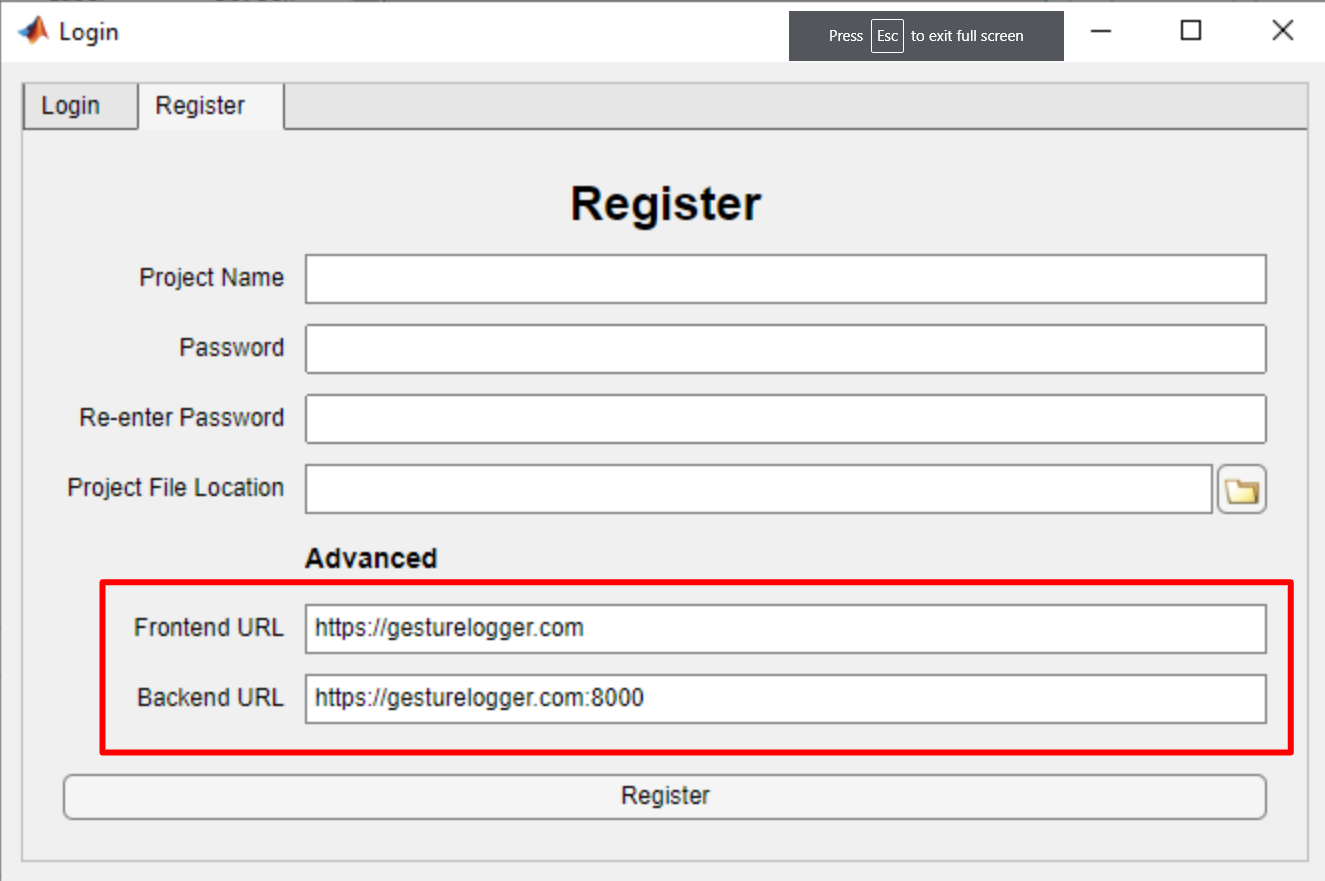
- default: https://gesturelogger.com
-
WebGestureCaptureBackend
is the backend that stores the captured data and communicates with the
application
- default: https://gesturelogger.com:8000
Hosting your own server will require a SSL certificate, as WebXR only works with https
You do not have to host both servers. You can use the default frontend at https://gesturelogger.com along with your own backend. You can mix and match these servers - as long as you specify which ones you are using when creating a project.
The advantages of hosting your own backend server are:
- You have complete control over and privacy of captured data
- You are not limited by the default server's data capacity and bandwidth
- You can change the server settings as to never delete data
- You will never lose data to an external crash
- You will never experience downtime
Additionally, it is quite easy to set up. If easier, you could set it up on the same machine you run the application from - running it whenever a participant needs to perform a gesture.
There is no guarantee that the default servers will be able to serve your requests. Though you are welcome to use the default servers to trial the software.
Setup
Register and Login
On opening the application you will first have to register your project with the server.
You can then login by selecting the .json project file with the name
of the project you registered last time
If the server does not respond, you might have to host your own server.
Creating Gesture Classes
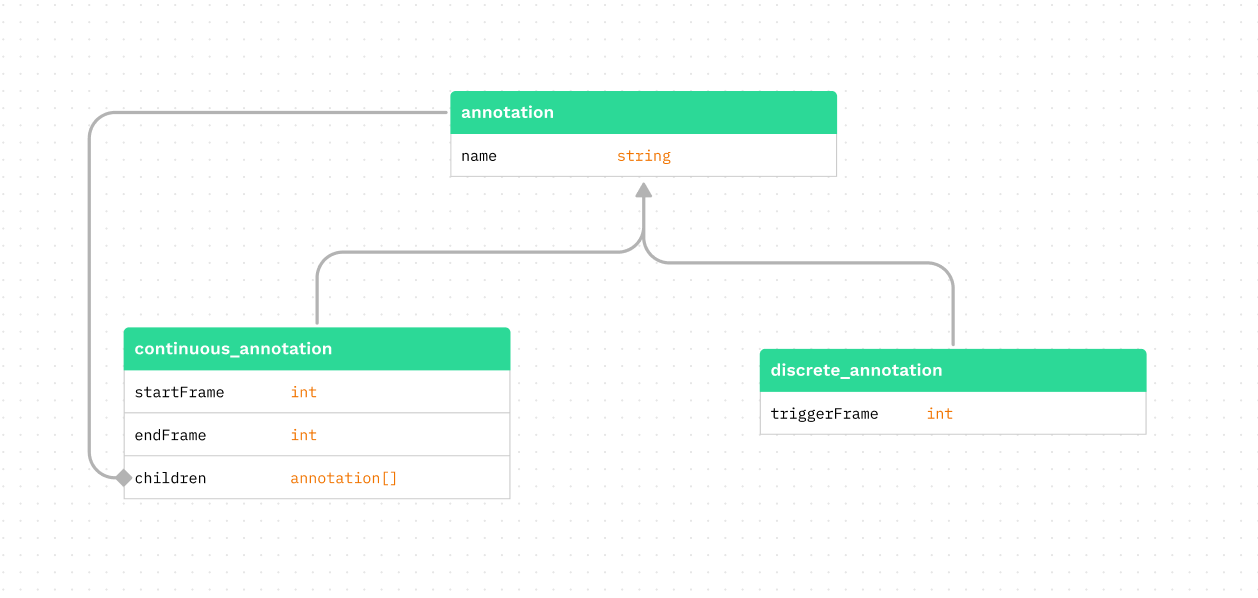 Outline of the relationship between annotations
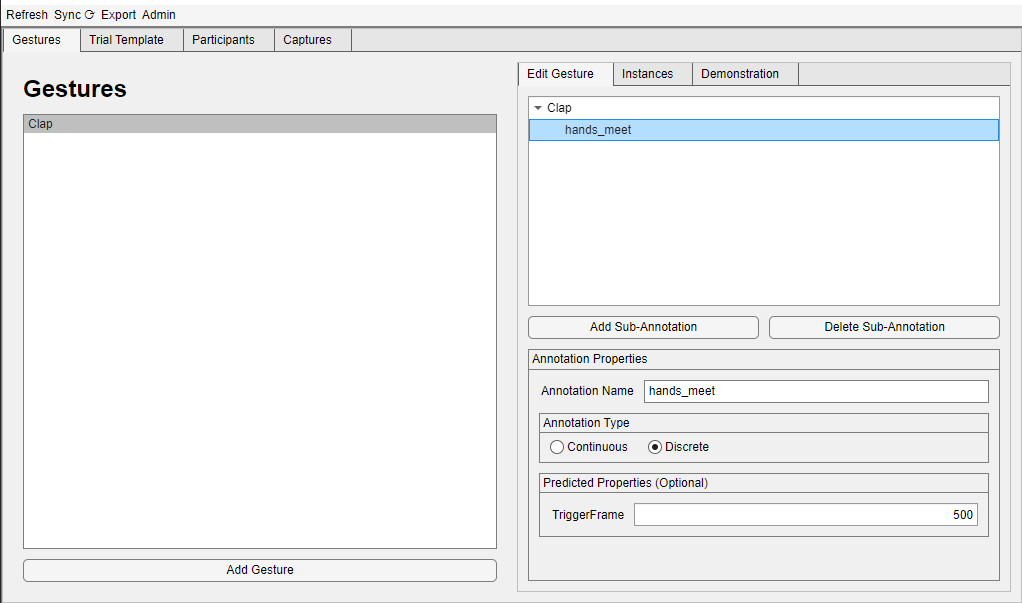
You can create multiple gesture classes. Each is coupled to an annotation.
An annotation can either be continuous or discrete.
A discrete annotation has a single integer value triggerFrame while a
continuous annotation has a beginning, startFrame, and an end, endFrame.
continuous annotations can have children called sub-annotations, which
are functionally the same as annotations but can not be coupled to a
gesture class.
You can create new gesture classes by clicking Add Gesture. You
can edit the annotation coupled with it in the right hand pane - adding
sub-annotations, changing the type, the name, etc.
The predicted properties panel is optional, and will be used to populate the default annotation values.
Adding Demonstrations
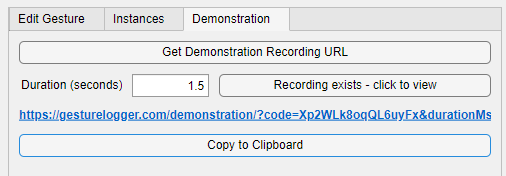
You can add demonstrations to the gestures that will be displayed to
participants by going to the Demonstration tab. The resulting link should be
opened with a VR headset. After following
the instructions, the demonstration should appear in any trials using that
gesture class. The link will expire after a few minutes.
You can preview a recorded demonstration by clicking on
Recording exists - click to view.
gesture.preview.mp4
Creating Trial Templates
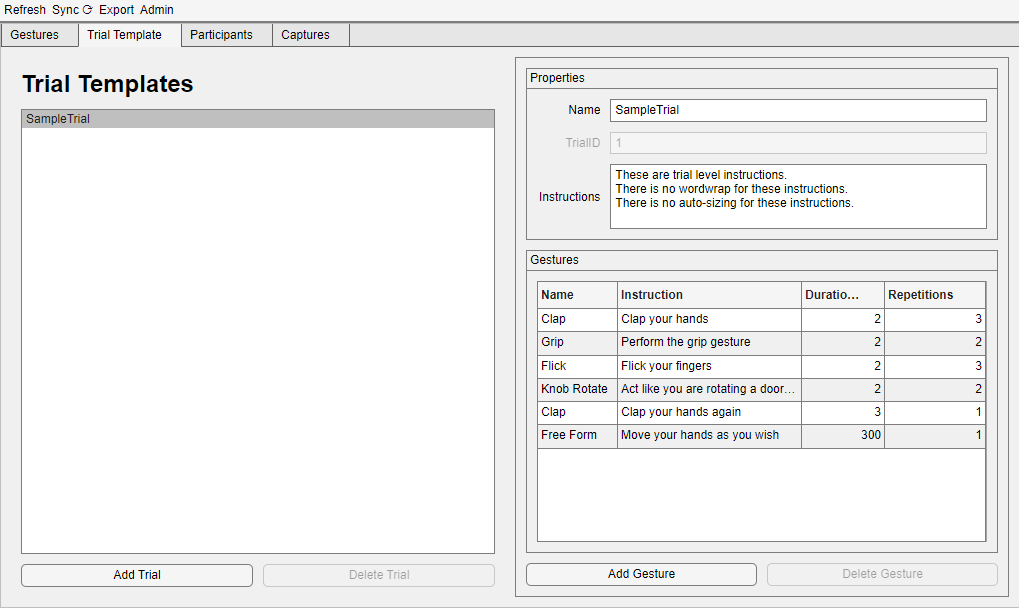
A trial is the unit of data capture from the perspective of the
application. You must put gestures in a trial template before
you can send them to the VR headset for data capture.
It consists of multiple gesture classes in a
particular order. Each gesture class is mapped to
- an instruction - text which is displayed before a participant must perform a gesture
- a duration - the duration in seconds that the participant's hands must be recorded for
- a number of repetitions - the number of times this
gesture classmust be repeated
these dictate how the trial will be displayed to the user during the VR experience.
A trial template also includes some trial-level properties, such
as a name and a trial-level instruction (which will be displayed
before any of the gestures).
None of the instruction text has word-wrap or auto-sizing, you might want to test that the text looks alright before you use the trial in a project.
Adding Participants and Pushing Trials
Now that you have some trial templates set up, you can add
participants and then push trials onto them - this works in
two parts:
- First create a participant, and add a
trialto it
- Sync the project with the server to push the
trialto the server
The sync button is in the menu bar at the top left of the app
You may also add any useful information about a participant
(such as an email, or a name) in a text box located under the Participant Data tab.
Capture
The project has now been set up and the data capture can start. This works as follows:
- Get a URL from the application
- Open the URL on the VR Headset
- Make the participant perform the trial
- Download the captured data from the server
Getting the URL
Each participant will have their own URL. This URL will not change, and they will be able to access any pending trials (i.e. trials which have been pushed but not completed) through this URL.
Opening the URL on the VR Headset
This URL must now make its way to a VR Headset. The only requirement on this headset is that it must have a WebXR enabled browswer. A few common headsets which support this are:
- Quest
- Hololens
- Magic Leap One
- ARCore devices
And so on - a more complete list can be found here.
How you move the URL to the headset is up to you, however we recommend you bookmark this URL on the headset's browser.
Making the participant perform the trial
The participant must open the URL, and click Enter VR and
follow the instructions to perform the trial.
We recommend you show them the below video (or a similar one) and explain the procedure to make things clear
demonstration.compressed.mp4
Once done, they are prompted to remove the headset. The trial can be performed anywhere, and at anytime, as long as they have the headset. This allows for en-masse collection of data once participants have gotten the hang of recording gestures.
Downloading the captured data
This is as simple as clicking the Sync button in the menu bar.
The data can be downloaded from the server for up to 3 days after it
was recorded. This time can be changed or removed entirely if you
decide to host your own servers.
Annotate and Export
This involves three steps:
Finding the right gesture
Downloaded gesture can be found in three main ways:
- By
gesture class- navigate to theGesturestab thenGesture Instances - By
participant- navigate to theParticipantstab thenPerformed Gestures - By annotation status - navigate to the
Capturestab
Annotating the gesture
Select the gesture instance in the table, and then select Open Gesture Annotator. You may have to wait for the new application to open.
See Gesture Annotator for details on using this part of the application.
Exporting the dataset
Select Export then exportSHREC in the menubar to open the export window.
Only annotations marked as completed are added to any export (see
annotation status).
The format string allows you to customise the name of files which store the gesture data. These are the modifiers you can use in the format string:
A
gesture instanceis an instance of a performed gesture. Eachgesture instancehas its own data file with captured hand data.
| modifier | description |
|---|---|
%n |
The name of the class of the gesture instance
|
%N |
The name of the trial the gesture instance was performed in |
%g |
The id of the gesture instance given by the internal database |
%G |
The id of the gesture class of this gesture instance given by the internal database |
%t |
The id of the trial instance of this gesture instance given by the internal database |
%T |
The id of the trial template of this gesture instance given by the internal database |
%p |
The index position of gesture instance within its trial template
|
%P |
The id of the participant who performed this gesture instance
|
%i |
The instructions attached to this gesture instance in its trial template
|
%r |
The number of repetitions of this gesture instance in its trial template
|
%d |
The duration in seconds of the data recorded for this gesture instance
|
%e |
Any additional participant information. See known bugs. |
%s |
1 if the gesture is a stream type, 0 otherwise |
The
%rmodifier only reports the number of repetitions directly mapped to thegesture class- not the total number of repetitions in the trial. See trial templates.
See export format for more details on the output of the export.
Gesture Annotator
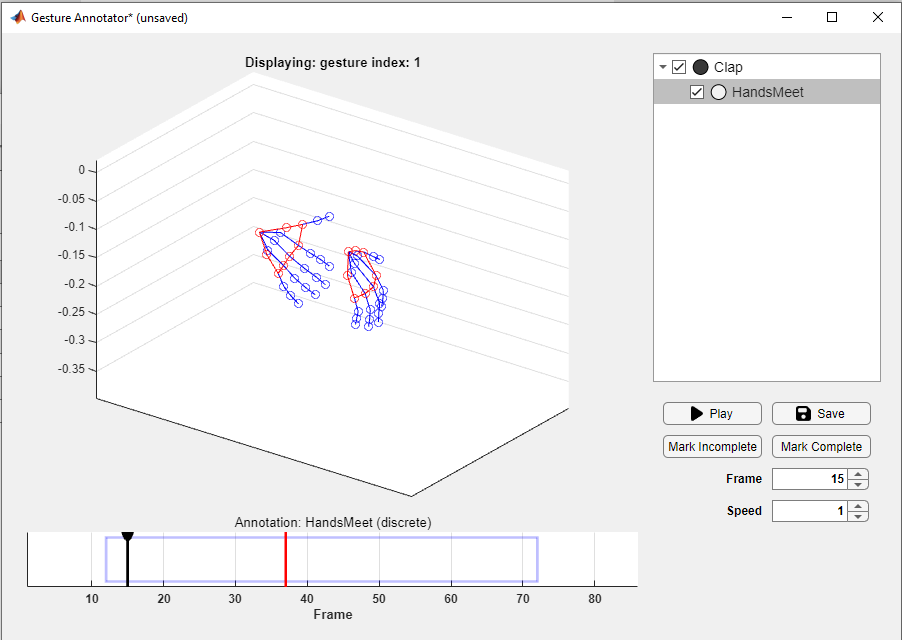 The gesture annotator is the part of the application that
deals with the process of annotating the captured gesture data.
This is done by adjusting both
 continuous and discrete annotations
until they match the captured data. This data will be included under the
annotations folder in the export.
In short, you can use the gesture annotator to view the captured gesture, and edit its annotations.
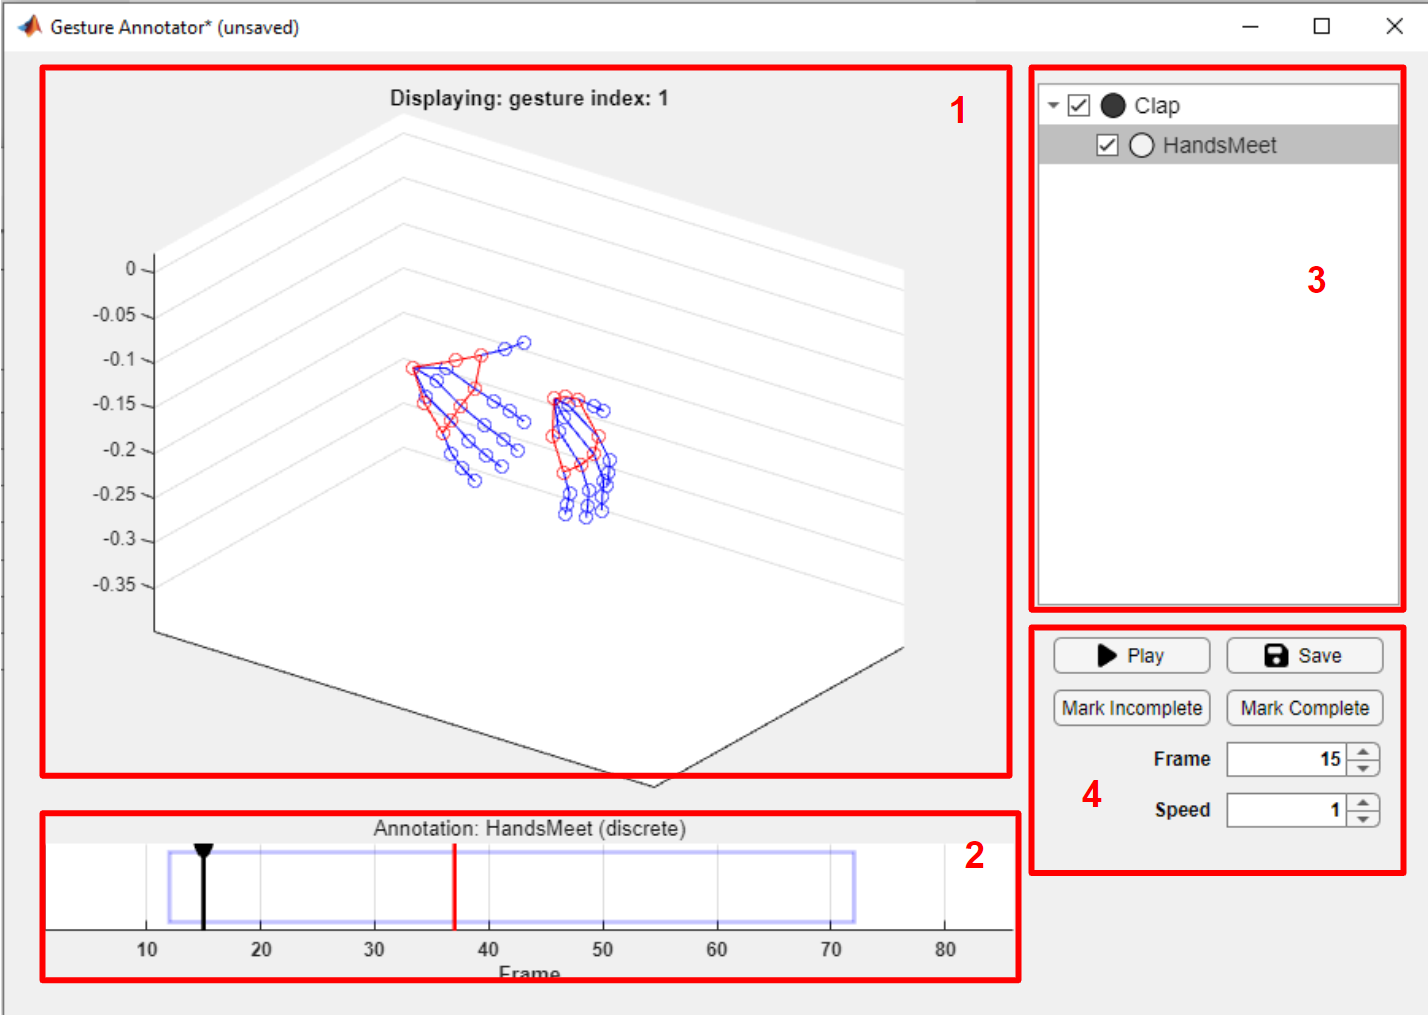 A screenshot of the gesture annotator window
The labels correspond to the following
The Gesture View
The gesture view is the part of the application where you can see the gesture itself modelled as a plot of connected joints. This is a standard MATLAB 3D plot and thus inherits all of the controls which are available to them, this includes:
- the ability to rotate the plot
- the ability to mark hand joints and see the co-ordinates
- the ability to pan and zoom
If you choose to use the plot controls, ensure you disable them before interacting with the timeline, otherwise you might encounter some bugs.
The Timeline
The timeline has 3 important components: the cursor, the annotations, and the annotation subtitle.
The cursor indicates the current frame displayed in the gesture view
and can be dragged with the LMB or moved with the use of the arrow keys
(additionally press shift to move the cursor faster).
The annotations are the blue rectangles (continuous) and red vertical lines
(discrete). Only one annotation can be selected at any given moment - this
annotation will be opaque while the others will be semi-transparent.
Additionally this annotation will be selected in the annotation view
and in the annotation subtitle.
The selected annotation can be dragged with the RMB, or moved to the
current cursor position by pressing a on the keyboard.
The selected annotation can be changed by clicking on an annotation with the
MMB, or by holding alt with the LMB. It can also be changed by selecting
it in the annotation view.
The Annotation View
The annotation view shows the annotations and their sub-annotations (see
creating gesture classes).
Selecting an annotation in the annotation view will do two things:
- Select that annotation in the timeline
- Move the current frame to that annotation and start playing it if it is
continuous
The small coloured circle to the left of the annotation name indicated whether the current frame is within that annotation.
You can hide an annotation in the timeline by unchecking it in the annotation view.
The Control Panel
This panel is mostly self-explanatory. You can
- Play/Pause
- Change playback speed
- Jump to a frame
- Save the annotation
- Mark annotation as complete/incomplete
An annotation must be marked as complete for it to be included in an export (the gesture annotator must be closed before an annotation marked as complete will be updated as so in the main window).
Marking a gesture as complete will not save it. You must save it manually as well.
Export Format
The exportSHREC export format will export a dataset similar to that curated
in the SHREC dataset.
- <project name>-export-<DD-MM-YY_HH-MM-SS>
	- data
        // one for each recorded gesture
		- <name given by format_string>.csv
	- annotations
        // one for each gesture class
		- <gesture class name>.csv
See format string.
Data File Format
Each data file will itself be a .csv file with the 359 columns of two types
- Position data (350 columns)
- Time data (2 columns -
startTimeandendTime)-
startTime- the time at which this frame's capture started in milliseconds -
endTime- the time at which this frame's capture ended in milliseconds
-
- Camera pose (7 columns)
Each row in the .csv file is one frame of captured data, and is in
chronological order.
A position header will be similar to: l0_pos_x.
- The first character
lindicates the left hand (rfor right) - The second part is a number from 0 to 24 corresponding to a hand joint as laid out in the WebXR Hand Input Specification
-
posindicated that this column holds information on the position of the joint.quatwould indicate the quaternion for that joint. - Finally
xindicated that this column holds thexco-ordinate of the data.poscan havex, y, zwhilequatcan havex, y, z, w.
Therefore the l0_pos_x column gives us the left-hand wrist's x position.
Annotation File Format
The annotation file is also a .csv file with one row per gesture instance
of that gesture class (there is one annotation file per gesture class).
Each row is of the following form,
<gesture instance id>(,<annotation_name>, <annotation_data>)*
where <annotation data> can be either continuous or discrete
<continuous annotation_data> = <start_frame>,<end_frame>
<discrete annotation_data> = <trigger_frame>
<gesture instance id> is the id of the gesture instance described
in that row. The <gesture instance id> also goes by giid or can be accessed
by the required %g modifier in the format string.
The part in parantheses exists for each annotation or sub-annotation, and
the order is not specified.
For example, consider a gesture instance with id 1 of the annotation
Clap, with a sub-annotation HandsMeet:
Clap (continuous) - startFrame: 100, endframe: 350
    - HandsMeet (discrete) - triggerFrame: 200
This would give us a row like
1,Clap,100,350,HandsMeet,200
Although it might seem that since each gesture class has the same format of annotations, the
<annotation_name>is redundant, it has been included for ease of use, to mimic the SHREC dataset, and on the off chance that someone edits the annotation of a gesture after already annotating some gestures.
Encouraged Workflow
The encouraged workflow is to:
- Mark all the required gestures as completed.
- Export those gestures, inluding relevant information in the format string.
- Sort and filter those gestures during analysis with the help of the file names given by the format strings.
Useful Notes
Editing and Deleting
There is no provision to delete trials, participants or gesture.
If you want to edit a trial, ensure you do it before you you push it to a participant.
If you want to edit a gesture, ensure you do it before you annotate any gesture instance of that gesture.
If you have changed a gesture, and want the annotation to propagate to any previously annotated gestures - you must delete the annotation file for that gesture (See Admin in the menubar).
Menubar
The menubar has 4 items:
- Refresh - updates the GUI if it appears to be stuck
- Sync - upload unpushed trials and download completed ones
- Export - export completed gestures
- Admin - get the locations of important folders and URLs
Annotation Status
A gesture can have one of three values as an annotation status
-
unannotated- this implies that this gesture has never been opened in the gesture annotator (i.e. internally, the annotation file has not been created). -
incomplete- this implies that the gesture has been opened, but the user has not marked it as complete. -
complete- the user has marked the gesture annotation as complete.
A geture must be marked as
completeto be included in an export
Known Bugs
-
Bug: Experiencing extreme lag and stuttering when using the gesture
annotator
- Fix: Your gesture capture likely has large gaps between frames, due to a faulty recording of the data. The best option is to discard that gesture.
-
Bug: A project can not be created since one with that name already,
exists even though the previous creation had supposedly failed.
- Fix: Find the location of the project folders and delete them (these are not the project file, though that also must be deleted). You can find its location by opening another project and going to Admin > DataFolder
- Issue: No sanitation of user input in the participant info section
Extension
To add functionality, you must have access to MATLAB AppDesigner.
Then you can simply open Login.mlapp to start.
You can run a development session from within MATLAB, and you can build a standalone application with the Application Compiler.
TODO
-
README updates
- Fix unimplemented links
- Record short video for the trials
- Add cron job to delete old files
- Add capability to choose backend server in frontend
- Add ability to change both server through application
- Add 'redo' ability and record data around how many retries etc.
- Fix bug where last gesture was not recorded
- Fix bug where participant url not showing in the test build
- Make loadFont more transparent (try to load in index.html)
- Make assigning to frameListeners explicit (no silent overwriting of listeners)
- Store metadata in server - and build route to serve it
-
Write documentation for the buttons (
clickable.ts) - Fix left/right hand bug
- Add ability to get more info on a gesture instance through a pop up box
- Add feedback for recording gestures (make it known that a gesture for this type has already been recorded + name the gesture in the recording)
- Add a clock (which speeds up when below a certain threshold)
- Add a progress bxr on top
- Add a way to view gesture demonstrations from inside the application
- Add a minimal section setup to the readme
Cite As
Saatvik (2025). GestureLogger (https://github.com/Saatvik-Lochan/GestureLogger/releases/tag/v1.0.0), GitHub. Retrieved .
MATLAB Release Compatibility
Platform Compatibility
Windows macOS LinuxTags
Community Treasure Hunt
Find the treasures in MATLAB Central and discover how the community can help you!
Start Hunting!Discover Live Editor
Create scripts with code, output, and formatted text in a single executable document.
| Version | Published | Release Notes | |
|---|---|---|---|
| 1.0.0 |


