Create Driving Scenario Variations Programmatically
This example shows how to programmatically create variations of a driving scenario that was built using the Driving Scenario Designer app. Programmatically creating variations of a scenario enables you to rapidly test your driving algorithms under multiple conditions.
To create programmatic variations of a driving scenario, follow these steps:
Interactively build a driving scenario by using the Driving Scenario Designer app.
Export a MATLAB® function that generates the MATLAB code that is equivalent to this scenario.
In the MATLAB Editor, modify the exported function to create variations of the original scenario.
Call the function to generate a
drivingScenarioobject that represents the scenario.Import the scenario object into the app to simulate the modified scenario or generate additional scenarios. Alternatively, to simulate the modified scenario in Simulink®, import the object into a Simulink model by using a Scenario Reader block.
The diagram shows a visual representation of this workflow.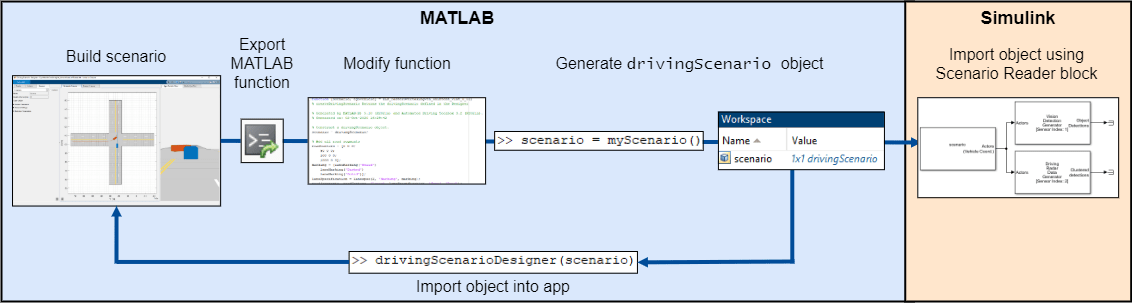
Build Scenario in App
Use the Driving Scenario Designer to interactively build a driving scenario on which to test your algorithms. For more details on building scenarios, see Create Driving Scenario Interactively and Generate Synthetic Sensor Data.
This example uses a driving scenario that is based on one of the prebuilt scenarios that you can load from the Driving Scenario Designer app.
Open the scenario file in the app.
drivingScenarioDesigner('LeftTurnScenarioNoSensors.mat')
Click Run to simulate the scenario. In this scenario, the ego vehicle travels north and goes straight through an intersection. Meanwhile, a vehicle coming from the left side of the intersection turns left and ends up in front of the ego vehicle, in the adjacent lane.
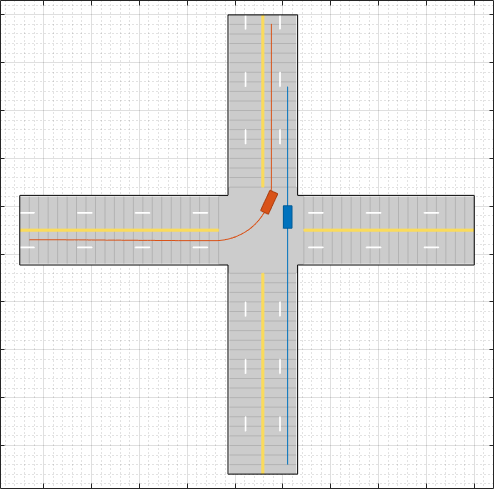
For simplicity, this scenario does not include sensors mounted on the ego vehicle.
Export MATLAB Function of Scenario
After you view and simulate the scenario, you can export the scenario to the MATLAB command line. From the Driving Scenario Designer app toolstrip, select Export > MATLAB Function. The exported function contains the MATLAB code used to produce the scenario created in the app. Open the exported function.
open LeftTurnScenarioNoSensors.m;![]()
Calling this function returns these scenario elements:
scenario— Roads and actors of the scenarios, returned as adrivingScenarioobject.egoVehicle— Ego vehicle defined in the scenario, returned as aVehicleobject. For details, see thevehiclefunction.
If your scenario contains sensors, then the returned function includes additional code for generating the sensors. If you simulated the scenario containing those sensors, then the function can also generate the detections produced by those sensors.
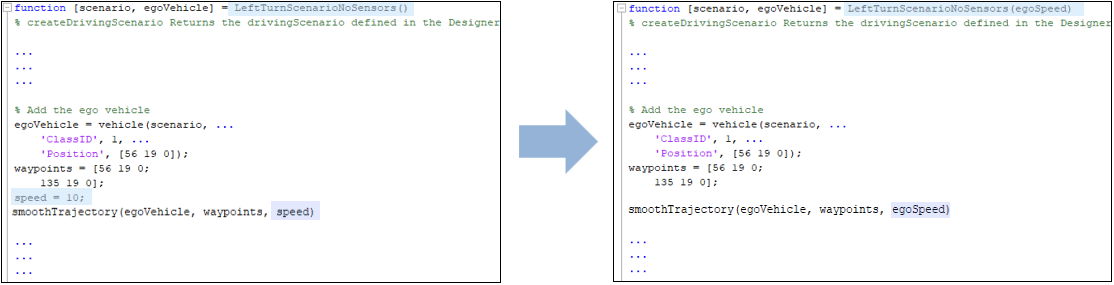
Modify Function to Create Scenario Variations
By modifying the code in the exported MATLAB function, you can generate multiple variations of a single scenario. One common variation is to test the ego vehicle at different speeds. In the exported MATLAB function, the speed of the ego vehicle is set to a constant value of 10 meters per second (speed = 10). To generate varying ego vehicle speeds, you can convert the speed variable into an input argument to the function. Open the script containing a modified version of the exported function.
open LeftTurnScenarioNoSensorsModified.m;In this modified function:
egoSpeedis included as an input argument.speed, the constant variable, is deleted.To compute the ego vehicle trajectory,
egoSpeedis used instead ofspeed.
This figure shows these script modifications.
To produce additional variations, consider:
Modifying the road and lane parameters to view the effect on lane detections
Modifying the trajectory or starting positions of the vehicles
Modifying the dimensions of the vehicles
Call Function to Generate Programmatic Scenarios
Using the modified function, generate a variation of the scenario in which the ego vehicle travels at a constant speed of 20 meters per second.
scenario = LeftTurnScenarioNoSensorsModified(20) % m/sscenario =
drivingScenario with properties:
SampleTime: 0.0400
StopTime: Inf
SimulationTime: 0
IsRunning: 1
Actors: [1×2 driving.scenario.Vehicle]
Barriers: [0×0 driving.scenario.Barrier]
ParkingLots: [0×0 driving.scenario.ParkingLot]
Import Modified Scenario into App
To import the modified scenario with the modified vehicle into the app, use the drivingScenarioDesigner function. Specify the drivingScenario object as an input argument.
drivingScenarioDesigner(scenario)
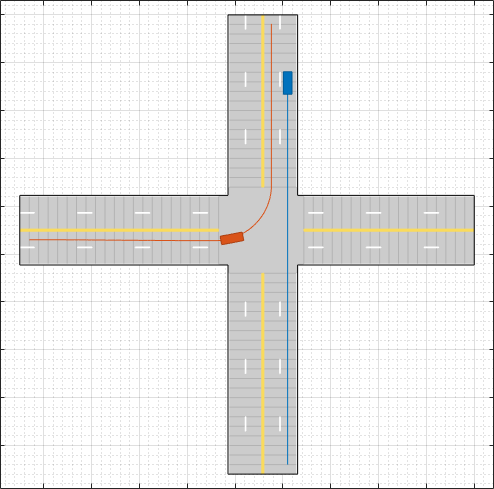
Previously, the other vehicle passed through the intersection first. Now, with the speed of the ego vehicle increased from 10 to 20 meters per second, the ego vehicle passes through the intersection first.
When working with drivingScenario objects in the app, keep these points in mind.
To try out different ego vehicle speeds, call the exported function again, and then import the new
drivingScenarioobject using thedrivingScenarioDesignerfunction. The app does not include a menu option for importing these objects.If your scenario includes sensors, you can reopen both the scenario and sensors by using this syntax:
drivingScenarioDesigner(scenario,sensors).If you make significant changes to the dimensions of an actor, be sure that the
ClassIDproperty of the actor corresponds to a Class ID value specified in the app. For example, in the app, cars have a Class ID of1and trucks have a Class ID of2. If you programmatically change a car to have the dimensions of a truck, update theClassIDproperty of that vehicle from1(car) to2(truck).
Import Modified Scenario into Simulink
To import the modified scenario into a Simulink model, use a Scenario Reader block. This block reads the roads and actors from either a scenario file saved from the app or a drivingScenario variable saved to the MATLAB workspace or the model workspace. Add a Scenario Reader block to your model and set these parameters.
Set Source of driving scenario to
From workspace.Set MATLAB or model workspace variable name to the name of the
drivingScenariovariable in your workspace.
When working with drivingScenario objects in Simulink, keep these points in mind.
When Source of ego vehicle is set to
Scenario, the model uses the ego vehicle defined in yourdrivingScenarioobject. The block determines which actor is the ego vehicle based on the specifiedActorIDproperty of the actor. This actor must be aVehicleobject (seevehicle). To change the designated ego vehicle, update the Ego vehicle ActorID parameter.When connecting the output actor poses to sensor blocks, confirm that in the sensor blocks, the parameter for specifying the source of the actor profiles is set to
From Scenario Reader block. With this option selected, the sensor blocks obtain the actor profiles directly from the actors specified in yourdrivingScenarioobject.
Generate Scenario Variants for Euro NCAP® ADAS Standards Testing
You can use the tools in Automated Driving Toolbox™ Test Suite for Euro NCAP® Protocols support package to automatically generate specifications for various Euro NCAP® tests, which include safety assessments of automated driving applications such as Safety Assist Tests and Vulnerable Road User (VRU) Protection Tests. For more information, see Get Started with Euro NCAP Test Suite.
Generate Scenarios from Real-World Sensor Data
If you have data from real-world sensors such as cameras, lidars or processed track-lists, you can use the Scenario Builder for Automated Driving Toolbox support package to automatically build and visualize virtual scenarios from real-world data. To learn more, see Overview of Scenario Generation from Recorded Sensor Data.
See Also
Apps
Blocks
- Radar Detection Generator | Vision Detection Generator | Scenario Reader | Lidar Point Cloud Generator