Create Simulink Exercise Using MATLAB Course Designer
This example shows how to add a Simulink® exercise to a course in MATLAB® Course Designer™.
Simulink exercises contain tasks that teach concepts incrementally. Learners receive automated assessments and feedback after submitting their task solutions. For examples of Simulink exercises, see courses like Simulink Onramp.

For more information on MATLAB Course Designer, see Create Courses Using MATLAB Course Designer.
Create Course and Course Module
Before you can create a Simulink exercise, you must create a course and course module. Each course consists of one or more course modules. Each module is a collection of learning activities, such as Simulink exercises.
Access MATLAB Course Designer at course-designer.mathworks.com or through your learning management system (LMS).
To open MATLAB Course Designer from your LMS:
Open MATLAB and Simulink Online™ Courses.
For information on how to integrate MATLAB and Simulink Online Courses into your LMS, see Integrate MATLAB and Simulink Online Courses with Learning Management System (LMS).
Click Launch Course Designer.
To create your own self-paced online course:
Click Create Course.
Specify a course title.
Click Create.

To add a module to your course:
Click Add Module.
Specify a module title. Optionally, specify a description and estimated duration for the module. Then, click Add.

Create Simulink Exercise
Each Simulink exercise consists of a starting model and one or more tasks.
To add a Simulink exercise to a course module:
Expand the module in which you want to add the Simulink exercise.
Select Add Learning Activity > Simulink Exercise.
To start editing the exercise, next to the untitled Simulink exercise, click Edit.

As you edit the exercise, MATLAB Course Designer saves changes automatically. If you close the browser tab, go to another site in the same tab, or sign out while working on a part of the exercise, your recent changes might not be saved.
Add Exercise Title
The exercise title sets learner expectations for the exercise. A good title defines the scope of the learning activity, particularly in the context of the other learning activities in the same module.
For example, consider the Simulink exercise titles from the Simulink Graphical Environment module of Simulink Onramp.

Blocks and Parameters — This title suggests that the exercise teaches learners block and parameter basics. The exercise covers topics such as how to use the Library Browser and quick insert menu to add blocks and how to set block parameter values.
Identifying Blocks and Signals — This title suggests that the exercise teaches learners how to identify blocks and signals. The exercise covers topics such as displaying hidden block names and providing custom block and signal names.
To add a title:
On the Edit Exercise Basics tab, in the left navigation pane, click Title.
In the Exercise Title box, enter the title of your exercise.

Add Starting Model and Constants
The learner begins the Simulink exercise with a starting model that they edit to form their solution. To provide learners with this starting point, each Simulink exercise requires a starting model. You determine how much to provide in the starting model. You can start learners with a blank model or an elaborate block diagram.
For example, a starting model can have a block diagram with two unconnected signal lines. As part of the exercise, you can ask learners to complete the block diagram.

If you have a model that you want the learner to create, consider uploading this model and then removing the elements that you want the learner to provide.
To add a starting model:
On the Edit Exercise Basics tab, in the left navigation pane, click Starting Model.
Choose how to add the starting model.
New — Create a blank model.
Upload — Upload a model from your file system.
The filename of the starting model appears under Starting Model.

To modify the starting model:
Next to the starting model filename, click Open.
On the Starting Model tab, modify the starting model.
MATLAB Course Designer saves changes automatically. If you close the browser tab, go to another site in the same tab, or sign out while editing the starting model, your recent changes might not be saved. When you modify an uploaded model, your changes are saved to the exercise, not to the original model in your file system.
Simulink exercises in MATLAB Course Designer use a simplified toolstrip that provides a subset of common actions, such as specifying the simulation stop time, simulating the model, and viewing logged data. To access other actions, click the canvas and press Ctrl+Period (.). Then, search for an action.

Optionally, add constants that load into the MATLAB base workspace when learners start the exercise.
On the Edit Exercise Basics tab, under Constants, click Add.
Select the variables that you want to be available at the start of the exercise. Then, click Add. When you add variables, you save a snapshot that preserves their current values.

As you iterate, you can modify the starting model and constants. For example, on the Edit Exercise Basics tab:
To replace the starting model, click New or Upload. Replacing the starting model permanently deletes the current starting model.
To save changes to constants, select the variables with new values. Then, click Update.
To save more constants, click Add. In the dialog box that opens, select the variables to save. Then, click Add.
To remove constants, select the variables to remove. Then, click Delete.
To reload all constants, click Load to Workspace.
Customize Library Browser
To limit the blocks that learners can access in the Library Browser and quick insert menu, replace the default libraries with a custom library. A custom library lets you control the blocks that learners use as they develop their solutions.
For example, a custom library can include a subset of source blocks for learners to use. For organization, the custom library can group blocks into different sublibraries by using Subsystem blocks.

When you add a custom library:
The Library Browser provides learners with only the blocks in the custom library. When applicable, these blocks are nested in sublibraries.

The quick insert menu provides learners with only the blocks in the custom library.

The custom library should contain all blocks that learners must use to complete the exercise. Optionally, include other blocks, such as blocks that learners can use for further practice.
Regardless of whether you add a custom library for learners, you can still access all libraries that are available in MATLAB Course Designer.
To replace the default libraries with a custom library for learners:
On the Edit Exercise Basics tab, in the left navigation pane, click Customized Library Browser.
Choose how to add the custom library.
New — Create a blank library.
Upload — Upload a library from your file system.

To modify a custom library:
Next to the custom library filename, click Open.
On the Custom Library tab, modify the custom library. For example, add blocks that support tasks and further practice. To add blocks, drag blocks from the Library Browser to the canvas or double-click the canvas and use the quick insert menu.
MATLAB Course Designer saves changes automatically. If you close the browser tab, go to another site in the same tab, or sign out while editing the custom library, your recent changes might not be saved. When you modify an uploaded library, your changes are saved to the exercise, not to the original library in your file system.

To replace the custom library, on the Edit Exercise Basics tab, click New or Upload. Replacing the custom library permanently deletes the current custom library.
To restore learner access to the default libraries, on the Edit Exercise
Basics tab, next to the custom library filename, click ![]() . This action removes and permanently deletes the
current custom library.
. This action removes and permanently deletes the
current custom library.
Add Supporting Files
When you add supporting files, the supporting files are on the MATLAB search path and are available throughout the exercise.
For example, suppose the starting model contains a masked block that uses a custom block icon. You can upload the image for the block icon as a supporting file.
To upload supporting files:
On the Edit Exercise Basics tab, in the left navigation pane, click Supporting Files.
Click Upload.
Select a supporting file to upload. Then, click Open.
The filename of the supporting file appears.

To remove a supporting file, next to the filename, click ![]() .
.
Create Task
A good task includes enough hands-on experience to teach a learning objective. To build learner confidence and reinforce prior skills, break exercises into small, focused tasks.
When you create an exercise, you also create its first task. To edit the task, in the task pane, click the task.

To create additional tasks, in the task pane, click Add Task.
Add Task Background
The task background sets the context for the task. Use the task background to explain the learning objective and provide high-level information that learners need to know to be able to complete the task.
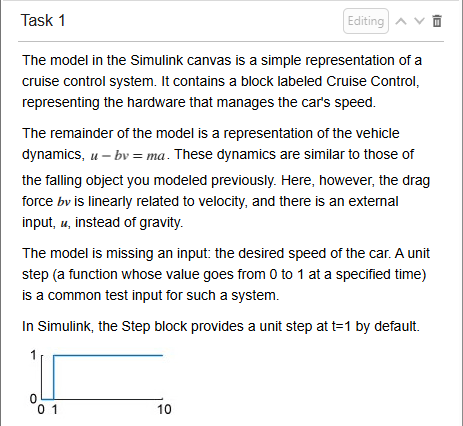
For example, the task background can describe what the starting model represents, the related equations, and what is missing.
To add a background:
On the Edit Task tab, in the left navigation pane, click Background.
Author your content. The background can contain a combination of formatted text, links, code, images, and equations.

To refresh the task preview, click outside the text editor.
Add Task Description
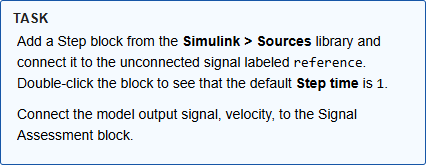
The task description provides the instructions you want the learner to follow to complete the task. Provide specific instructions such as which blocks to add, which block ports to connect, and which parameter values to specify.
For example, the task description can instruct learners to add and connect blocks.
To add a task description:
On the Edit Task tab, in the left navigation pane, click Task.
Author your content. The task description can contain a combination of formatted text, links, code, images, and equations.
To refresh the task preview, click outside the text editor.
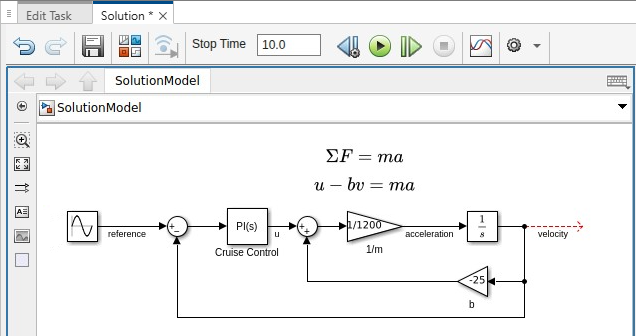
Add Task Solution
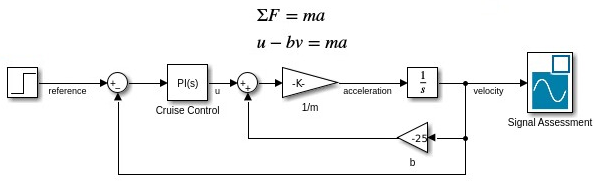
The solution for a task in a Simulink exercise is a Simulink model that represents the correct answer for the task. The solution lets you assess the learner's solution for the task. To provide further practice without an assessment, you can leave the solution empty.
For example, the solution for a block diagram with two unconnected signal lines can be a completed block diagram with those signal lines connected.
To add a solution:
On the Edit Task tab, in the left navigation pane, click Solution.
Choose how to add the solution.
Copy — Copy the starting model or a solution from another task.
New — Create a blank model.
Upload — Upload a model from your file system.

To modify the solution:
Next to the solution filename, click Open.
On the Solution tab, modify the solution. If you copy the starting model or the model from the previous task, update the model the same way you expect learners to update the model for this task.
MATLAB Course Designer saves changes automatically. If you close the browser tab, go to another site in the same tab, or sign out while editing the solution, your recent changes might not be saved. When you modify an uploaded model, your changes are saved to the exercise, not to the original model in your file system.
Simulink exercises in MATLAB Course Designer use a simplified toolstrip that provides a subset of common actions, such as specifying the simulation stop time, simulating the model, and viewing logged data. To access other actions, click the canvas and press Ctrl+Period (.). Then, search for an action.
To let learners view the solution, on the Edit Task tab, select Enable learner to see solution.
To replace the current solution, on the Edit Task tab, click Copy, New, or Upload. Replacing the solution permanently deletes the current solution.
To permanently remove the current solution, next to the filename, click ![]() .
.
Add Task Assessment
The task assessment lets you evaluate the learner solution for correctness. In the assessment, you can test for block existence, correct signal data, and more.
Consider these best practices:
Have at least one test for each learner objective in the task.
If the task requires more than five tests, break the task into multiple tasks.
Focus on testing the elements that demonstrate an understanding of the concepts. You do not need to have a test for each block or signal the learner adds to the model for the task.
For example, the assessment can test whether the learner solution captures the same data that you capture for a signal. When the learner works on this task, the test appears in the Assessment pane.

After the learner submits their solution, the test returns a pass or fail result. If the learner's solution fails the test, the learner can try again.

To add tests for your assessment:
Add a solution if you have not already done so. To add a solution, see Add Task Solution.
If the solution is open, click the Solution tab. Otherwise, on the Edit Task tab, in the left navigation pane, click Solution. Then, next to the solution filename, click Open.
In the Assessment pane of your solution, click Add Test and select an option from the list.
For example, to test that the learner solution captures the same data that you
capture for a signal named velocity:
Select Add Test > Signal data.
In the model, connect the
velocitysignal to the new Signal Assessment block.Click Capture Signal Data.
Check that the Signal source value and captured signal data match your expectations.
Use the default tolerance.

For more information about the tests you can create in MATLAB Course Designer, see Simulink Exercise Assessment Tests in MATLAB Course Designer.
Add Task Hint
To help the learner if they get stuck with a task, provide a hint that helps the learner complete the task. A good hint can include additional reference material, address common mistakes, and remind learners of important details such as block names.
For example, if the task is to add a block, the hint can explain how to add a block. When the learner works on a task, the hint is hidden until they click the Hint hyperlink.

To add a task hint:
On the Edit Task tab, in the left navigation pane, click Hint.
Author your content. The task hint can contain a combination of formatted text, links, code, images, and equations.

Preview Task
A learner preview lets you check the functionality and solution of the tasks you create.
To preview a task from the learner perspective:
Check that the exercise has a starting model.
If the exercise has more than one task and you want to preview the tasks out of order, check that the previous task has a complete solution. For example, to preview task 2, check that task 1 has a solution. Each task builds on the solution of the previous task.
In the task pane, click Learner Preview. Then, select whether to preview the exercise from the beginning or from a specific task.
Complete the task as if you are the learner.

To close the learner preview, at the top left, click Return to Editing.
Next Steps
To add more tasks to the Simulink exercise, in the task pane, click Add Task.
To reorder tasks, in the task pane, use the ![]() and
and ![]() buttons.
buttons.
To add additional modules and learning activities to your course, see Create Courses Using MATLAB Course Designer.
After your course is ready, click Publish. Then, you can assign your course to learners from your learning management system. For more information on how to assign courses, see Add MATLAB and Simulink Online Courses to LMS Course.