Use External File Data in Test Cases
Test cases can use data, such as inputs, parameter overrides, expected outcomes, and
baseline data, defined in MAT files, MATLAB® script (.m) files, or Microsoft®
Excel® files. For information on how to create and format these files, see Create External Data Files to Use in Test Cases, and for Excel, see also Microsoft Excel Import, Export, and Logging Format.
In the Test Manager, you can
Import baseline data and inputs from Excel and MAT files
Import parameter values from Excel files, MAT files, and MATLAB scripts
Export parameters to MAT files and MATLAB script (
.m) filesAdd multiple external input files to a test case
Assign one input file to each iteration
Data Mapping
Mapping Modes
To use external data, you map the data to your system under test (SUT) using these mapping modes:
The names of the inport block the signal data corresponds to
The full block pathname, in the form
system/blockThe name of the signal associated with the inport block
The port number, that is, sequential port numbers of the inport blocks, starting at 1
For more information about how Simulink® handles inport mapping, see Map Root Inport Signal Data.
Mapping Status
When you map external inputs to model elements, the mapping creates these possible results. These results appear under Inputs in the Test Manager interface in the Status column:
Mapped — The mapping succeeded and no further action is needed.
Failed — The mapping failed. Click the Failed link for more information.
Warning — The mapping occurred with warnings. Click the Warning link to see whether you need to address them
Stale — This status can occur when you update your external inputs in Test Manager. A stale state occurs if you did not map the new inputs. To address this status, click the Status link, which opens the Add Input dialog box. Click Map Inputs to map the new input data and then click Add.
Create a Test Case from an Excel Spreadsheet
This example shows how to import an Excel spreadsheet to define a test case.
1. Open the Simulink Test Manager.
sltest.testmanager.view
2. Select New > Test from Spreadsheet. This opens the Create Test from Spreadsheet Wizard.
3. Select Use existing test data from a spreadsheet. Then, click the folder icon and from the working folder, select coordinate_text.xlsx as the spreadsheet. Click Next.
4. Enter coordinate_transform_test as the model. Click Next.
5. On the Attributes page, check that the attribute categories in the spreadsheet are displayed.
6. Click Validate to map each input to the model by block name. When the attributes are validated, the icons change to green. If necessary, go back to the Data or System tab to change the spreadsheet and/or system under test, click Refresh, and validate again. Click Next.
7. Specify a location to save the test file and click Done.
Simulink Test™ creates a new test case and imports the spreadsheet.
To see the data used from the spreadsheet, expand these sections:
Parameter Overrides
Inputs
Baseline Criteria
Table Iterations section under Iterations.
The fields defined in the spreadsheet are locked to the spreadsheet, and cannot be edited in the Test Manager. To see how the data is formatted or to edit the fields, open the coordinate_text.xlsx file outside of MATLAB.
If you cannot see all the data in a table column in a section, click + in the upper right corner to hide other columns and resize the desired column.
For multi-dimensional signals, each dimension is represented in a separate column in the spreadsheet. By default, only the dimensions with non-zero values are included. If all dimensions have zero value, then only the last dimension is included in the spreadsheet.
Import an Excel Spreadsheet into an Existing Test Case
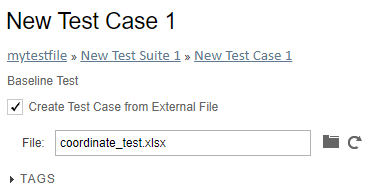
If you have a test case and want to add test data to it from an Excel spreadsheet, you must associate the test case with the spreadsheet:
Open the test case.
Check the Create Test Case from External File option. You can use this option only for Excel spreadsheets.
Click the Browse files button
 and select the spreadsheet that contains the
test data.
and select the spreadsheet that contains the
test data.
The input, parameter, and comparison signal data in the spreadsheet override the data in the test case. The fields defined in the spreadsheet are locked to the spreadsheet.
To edit the spreadsheet, do one of the following:
In the Inputs section, select the Excel external input file and click Edit to open the Excel spreadsheet.
Edit and save the spreadsheet outside of MATLAB. In the Test Manager, next to the File field, click Refresh.
Add Multiple Microsoft Excel Spreadsheets as Input to a Test Case
You can import multiple Microsoft Excel spreadsheets at once and specify a range of data. Selecting sheets and specifying ranges is useful when each sheet contains a different data set or the same file contains input data and expected outputs.
In the test case, expand the Inputs section and click Add.
Browse to your Microsoft Excel file and click Add.
Select each sheet that contains input data. You can specify a range of data.
If you want to use each sheet to create an input set in the table, select Create scenarios from each sheet.
Under Input Mapping, select a mapping mode.
Click Map Inputs. The Mapping Status table shows the port and signal mapping.
For more information about troubleshooting the mapping, see Understand Mapping Results.
Click Add.
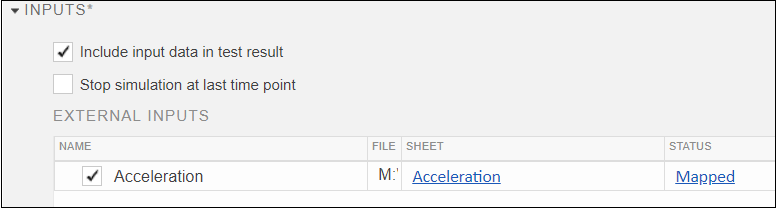
Include Microsoft Excel Test Data in Test Results
In the test case, expand the Inputs section and click Include input data in test result.
Under the External Inputs table, click Add.
In the Add Input dialog box, specify the Excel filename and the mapping mode, which specifies how to map the Excel data to root-level Inport blocks in the model.
Click Map Inputs. The Mapping Status table shows the port and signal mapping.
Click Add.
Importing Test Inputs from Microsoft Excel
Test a model using inputs stored in Microsoft® Excel®.
This example shows how to create a test case in the Test Manager and map inputs to the test case from a Microsoft® Excel® file. Input mapping supports Microsoft Excel spreadsheets only for Microsoft Windows®.
Create a Test File
1. Open the Test Manager.
sltest.testmanager.view
2. In the test manager toolbar, select New > Test File. Save the file to a writable directory. The test manager creates a test file with an empty baseline test case.
3. In the test browser, select the test case. In the test editor, under the System Under Test section, enter slexAutotransRootInportsExample.

Configure the External Inputs
1. Expand the Inputs section of the test case.
2. To include the input data in the test results, click Include input data in test result.
3. Under the External Inputs table, click Add.
4. In the Add Input dialog box, for File, select the sltestExampleInputs.xlsx from the current directory. This file contains two tabs, named Acceleration and Braking. Each tab represents a complete set of inputs for a single simulation.
5. In the Add Input dialog box,
Select the Acceleration sheet from the sheets table.
Select Mapping Mode :
Block Name.Click Map Inputs.
Click Add.
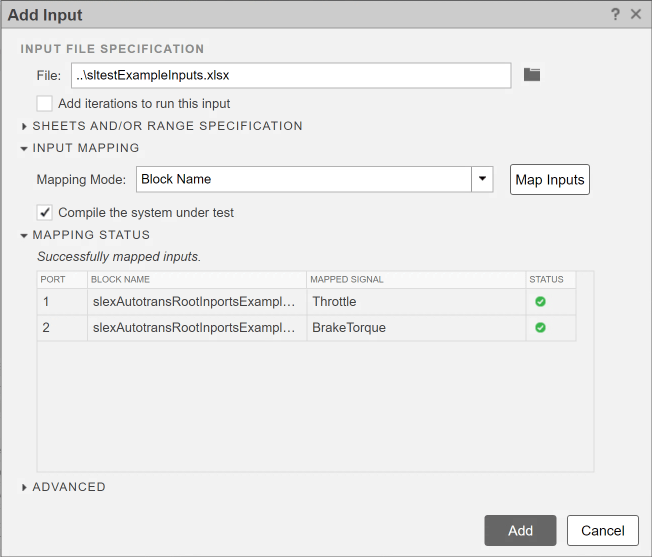
The Mapping Mode controls the method used to map data from the Microsoft Excel sheet to root-level Inport blocks in the model.
The test case shows the inputs mapped.
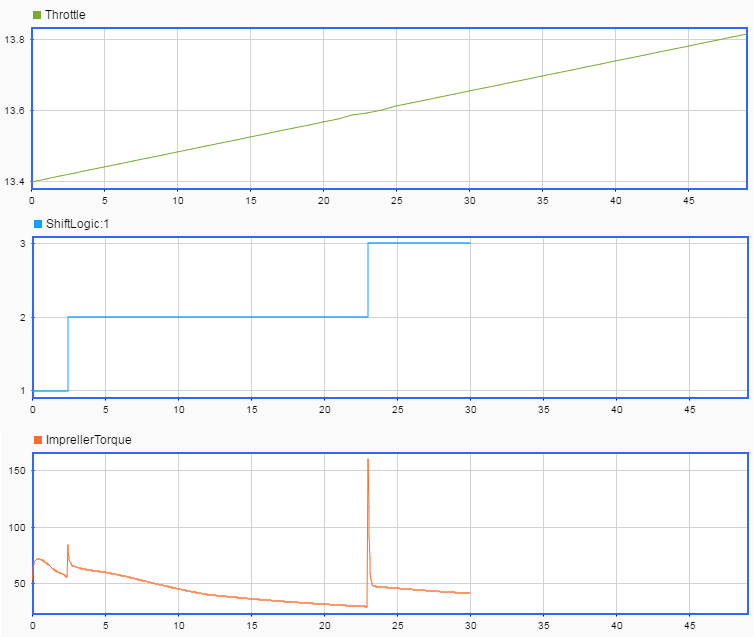
Run the Test
1. In the toolbar, click Run.
2. In the Results and Artifacts pane, you can plot signals from the external inputs or the simulation output.
Add a MAT File or MATLAB Script (.m) File as External Input
In the test case, expand the Inputs section and click Add.
Browse to the MAT file or MATLAB script (
.mfile) and click Add.Under Input Mapping, choose a mapping mode.
Click Map Inputs. The Mapping Status table shows the port and signal mapping.
For information about troubleshooting the mapping status, see Understand Mapping Results.
Click Add.
You can also use an external MAT file or MATLAB script (.m) file for baseline data and parameter
overrides.
To create a MAT file, see the matfile and save functions. Use a text editor to
create a MATLAB script (.m) file.
Using External Files Programmatically
You can use MATLAB commands to specify the external file to use in a test case. See the
IsTestDataReferenced and TestDataPath
properties described in the setProperty method of
sltest.testmanager.TestCase. For example,
tc = createTestCase(myTestSuite,'myTestCase');
setProperty(tc,'Model','myTestModel');
tc.setProperty('IsTestDataReferenced',true);
tc.setProperty('TestDataPath','C:/myTestFiles/myData.xlsx');
See Also
sltest.testmanager.TestInput | sltest.io.SimulinkTestSpreadsheet