Create an App for Comparing Edge Detection Methods
R2026bThis example shows how to build an app to interactively detect edges in images using App Designer. Using the EdgeDetectionComparisonApp app, users can interactively detect edges in the same image using two different edge detection methods and compare the results side by side. The app can compare the results of edge detection methods supported by the edge function.
In this example, you first build a custom UI component you can use to detect edges in an image, and then build an app that uses the custom UI component to compare edge detection results. The custom UI component inherits from the matlab.ui.componentcontainer.ComponentContainer class. You can reuse the custom UI component in different apps to improve code reusability, logic isolation, and maintainability.
Open App Designer
App Designer is an interactive development environment for designing custom UI components and apps and programming their behavior.
To build the app from scratch, open App Designer using this command. Alternatively, you can open App Designer by selecting the Design App option on the Apps tab of the MATLAB® toolstrip.
appdesigner
In this example, you build the EdgeDetector custom UI component and the EdgeDetectionComparisonApp app. The EdgeDetector component and the EdgeDetectionComparisonApp app are also attached to this example as supporting files. For information on running the app, see the Compare Edge Detection Methods Using the App section.
You can also open this example from the App Designer home page by clicking Show examples in the Apps section of the home page and selecting Compare Edge Detection Results from the list of examples.
You can customize the code of the app in the attached supporting files. For information on customizing the app, see the Customize the App section.
App Layout Design
The EdgeDetectionComparisonApp app has two main regions: a toolstrip and a working area.
The toolstrip contains these sections:
Import Image — Consists of UI components used to import image data from a file or the workspace.
Export — Consists of UI components used to export the detected edges.
The working area of the app consists of a single section containing two instances of the custom UI component EdgeDetector, which detect edges in the imported image using two different methods.
Each EdgeDetector component contains these sections.
Image view — Consists of a
ViewerUI component that displays the imported image with edges detected using the selected method. The component displays the image using theimageshowfunction. The handle of the displayed image is anImageobject, for which theViewerobject is the parent. For more information about theViewerobject, see Viewer Properties. For more information about theImageobject, see Image Properties.Edge detection — Consists of UI components to interactively select an edge detection method and its parameters.
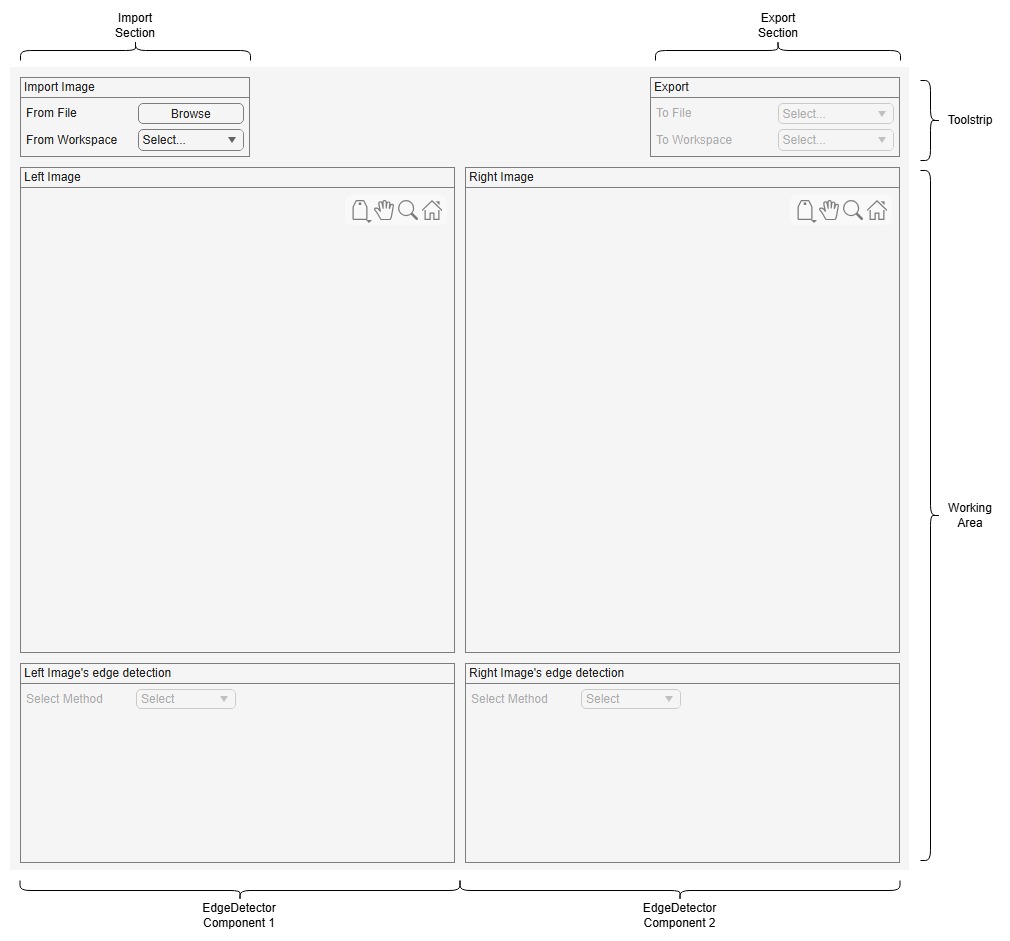
The app uses this grid layout structure to create the defined layout.
Main app figure
Main app grid layout
Toolstrip grid layout
Toolstrip elements like import, export
Working area grid layout
EdgeDetectorcustom UI component
For more information on using grid layout with App Designer, see Use Grid Layout Managers in App Designer.
Create the EdgeDetector Custom UI Component
Each EdgeDetector custom component includes these properties:
OriginalImage— Original image loaded by the user of the app.Image— Displayed image. Initially,Imageis the same asOriginalImage. When you apply an edge detection method to the image, the app updatesImageto the edge detection image being displayed.UpdateRequestedFlag— Flag to trigger theupdatemethod of the component. This is a private flag, not accessible to users of the app.
Custom UI components inherit from the matlab.ui.componentcontainer.ComponentContainer class and have two primary methods: setup and update.
The setup method and other custom functions of the EdgeDetector custom component create and set up its layout, including these UI components.
A grid layout for the UI components.
The
Viewerobjects used to display the image.UI elements used to interactively select an edge detection method and its parameters.
The EdgeDetector component stores the image in which to detect edges in the Image property. When the user sets the Image property of the component, the component resets to the default view. The set.Image method defines this behavior.
function set.Image(comp,img)
    % Save the input image to OriginalImage and display it.
    if ~((ismatrix(img) || (ndims(img)==3 && size(img,3)==1)))
        error("Input image must be specified as a 2-D grayscale image or 2-D binary image.");
    end
    comp.OriginalImage = img;
    comp.ImageshowHandle.Data = img;
    % Reset edge detection selection on new data load
    comp.SelectEdgeMethodDropDown.Value = comp.DefaultDropDownValue;
    comp.SelectMethodLabel.Enable = "on";
    comp.SelectEdgeMethodDropDown.Enable = "on";
    comp.enableThreshold(false,false);
    comp.enableNoThinning(false);
    comp.Param3Label.Visible = "off";
    delete(comp.Param3UIComponent);
end
When the user changes the edge detection method or the parameters of the selected edge detection method, the EdgeDetector component triggers the update method. The update method detects the edges based on the original image and current input values and displays the results.
function update(comp)
    % Based on the current selection of method, compute the
    % edge detected image and display it
    value = comp.SelectEdgeMethodDropDown.Value;
    try
        switch value
            case {"Sobel","Prewitt","Roberts"}
                if comp.NoThinningCheckBox.Value
                    comp.ImageshowHandle.Data = edge(comp.OriginalImage, ...
                        value, ...
                        comp.ThresholdEditField.Value, ...
                        comp.Param3UIComponent.Value, ...
                        "nothinning");
                else
                    comp.ImageshowHandle.Data = edge(comp.OriginalImage, ...
                        value,...
                        comp.ThresholdEditField.Value, ...
                        comp.Param3UIComponent.Value, ...
                        "thinning");
                end
            case "log"
                comp.ImageshowHandle.Data = edge(comp.OriginalImage,"log", ...
                    comp.ThresholdEditField.Value, ...
                    comp.Param3UIComponent.Value);
            case "zerocross"
                if ~strcmp(comp.Param3UIComponent.Value,comp.DefaultDropDownValue)
                    filterH = evalin("base",comp.Param3UIComponent.Value);
                    comp.ImageshowHandle.Data = edge(comp.OriginalImage,"zerocross", ...
                        comp.ThresholdEditField.Value, ...
                        filterH);
                else
                    comp.ImageshowHandle.Data = edge(comp.OriginalImage,"zerocross", ...
                        comp.ThresholdEditField.Value);
                end
            case "Canny"
                comp.ImageshowHandle.Data = edge(comp.OriginalImage,"canny", ...
                    [comp.ThresholdEditField.Value comp.HighThresholdEditField.Value], ...
                    comp.Param3UIComponent.Value);
            case "approxcanny"
                comp.ImageshowHandle.Data = edge(comp.OriginalImage,"approxcanny", ...
                    [comp.ThresholdEditField.Value comp.HighThresholdEditField.Value]);
            otherwise
                comp.ImageshowHandle.Data = comp.OriginalImage;
        end
    catch ME
        comp.displayError(ME.message);
    end
end
Define Callbacks for EdgeDetector Custom UI Component
The EdgeDetector component uses callback functions to handle user interactions. The callback functions ensure that the EdgeDetector component triggers the update method when you change the image, edge detection method, or parameters.
For example, when you change the selected edge detection method, the EdgeDetector component deletes the existing UI elements for the parameters of the previous edge detection method and creates UI elements for the parameters of the newly selected method. The SelectEdgeMethodDropDownValueChanged callback, as shown here, invokes a method-specific function. For example, if you select the zerocross edge detection method, the callback invokes the createInputForZerocross function. The method-specific function creates the UI elements for the edge detection parameters and invokes the updateImage function when you change any parameter. The updateImage function in turn sets the UpdateRequestedFlag to true, which triggers the update method of the EdgeDetector component.
function SelectEdgeMethodDropDownValueChanged(comp, event)
    % Callback function to create the UI components
    % of the selected edge detection method
    delete(comp.Param3UIComponent);
    value = comp.SelectEdgeMethodDropDown.Value;
    switch value
        case {"Sobel","Prewitt","Roberts"}
            comp.createInputForSobelPrewittRoberts();
        case "log"
            comp.createInputForLog();
            comp.Param3UIComponent.Value = 2;
        case "zerocross"
            comp.createInputForZerocross();
        case "Canny"
            comp.createInputForCanny();
            comp.Param3UIComponent.Value = sqrt(2);
        case "approxcanny"
            comp.createInputForApproxCanny();
        otherwise
            comp.enableThreshold(false,false);
            comp.enableNoThinning(false);
            comp.Param3Label.Visible = "off";
    end
end

function createInputForZerocross(comp)
    % Function to create UI components to get zerocross method parameters
    % from user
    comp.enableThreshold(true,false);
    comp.enableNoThinning(false);

    % Create Filter drop-down
    comp.Param3Label.Visible = "on";
    comp.Param3Label.Text = "Filter";
    filterDropdown = uidropdown(Parent=comp.EdgePropertiesGridLayout, ...
        Items=comp.DefaultDropDownValue);
    filterDropdown.Layout.Row = 2;
    filterDropdown.Layout.Column = 2;
    filterDropdown.DropDownOpeningFcn = @(src,~)comp.getVarFromWorkspace(src);
    filterDropdown.ValueChangedFcn = @(~,~)comp.updateImage();
    comp.Param3UIComponent = filterDropdown;
end

function updateImage(comp)
    % Function to request update when user updates a UI input
    comp.UpdateRequestedFlag = true;
end
The EdgeDetector component displays error messages when an error occurs in execution. The component displays the error message in a dialog box using the uialert function. Because uialert requires a figure to display the message, the EdgeDetector component attempts to get the ancestor figure of the component to display the message. If it fails to get an ancestor figure, it displays the error message in the command window by using the error function instead of a dialog box. You can capture this behavior of displaying error messages by defining the displayError function as follows.
function displayError(comp,errorMsg)
    % Function to display error messages. To display the error
    % message as a uialert, this function tries to get an ancestor
    % figure to which the custom UI component is parented. If
    % it fails to find an ancestor figure, the error passes to the command window.
    fig = ancestor(comp,"figure");
    if isempty(fig)
        error(errorMsg);
    else
        uialert(fig,errorMsg,"Error");
    end
end
Define App Methods
The app uses methods to import and visualize data, process user input and update the display, export the detected edges, and control the app state. The app also uses some helper functions to improve code readability and code reusability. These are some of the important app methods.
Create Two EdgeDetector Components
To enable users to view the results of two different edge detection operations side by side, the working area of the app is split into two components, defined as the LeftComponent and RightComponent properties of the app class. Each component of the working area contains an instance of the EdgeDetector custom UI component and the Viewer objects from the EdgeDetector components are linked using the linkviewers function. Linking the viewers enables the user to pan and zoom both images synchronously. The startupFcn method defines the creation and placement of the custom UI components.
function startupFcn(app)
    % Initialization function to create the component containers
    % and link their viewers
    app.LeftComponent = EdgeDetector(app.WorkingAreaGridLayout);
    app.RightComponent = EdgeDetector(app.WorkingAreaGridLayout);
    linkviewers([app.LeftComponent.Viewer app.RightComponent.Viewer],"on");

    % Set a name for each component to make it easy to identity them
    app.LeftComponent.ImageName = "Left Image";
    app.RightComponent.ImageName = "Right Image";
end
Reset App on New Image Load
When the user loads a new image into the app, both EdgeDetector components clear the existing data and display the loaded image with no edge detection applied. The app also enables the Export section of the app toolstrip. The resetAppOnNewDataLoad method defines this behavior.
function resetAppOnNewDataLoad(app,img)
    % Function to set input image and reset app on new data load
    app.LeftComponent.Image = img;
    app.RightComponent.Image = img;

    % Enable exporting
    app.ToFileLabel.Enable = "on";
    app.ToFileDropDown.Enable = "on";
    app.ToWorkspaceLabel.Enable = "on";
    app.ToWorkspaceDropDown.Enable = "on";
end
Import Images in App
Users can load an image into the app from a file or from the workspace using the Import Image section of the app toolstrip. If the user loads the image from a file by selecting the Browse option, the app opens a dialog box enabling the user to browse for files that have image file formats. When the user selects a new image file, the app resets. The BrowseButtonPushed method defines the file browsing behavior.
% Button pushed function: BrowseButton
function BrowseButtonPushed(app,event)
    % Function to import an image file by browsing file system
    filterSpec = app.getSupportedFileFilter();

    [file,location] = uigetfile(filterSpec,"Select an image file");
    if ~isequal(file,0)
        try
            imageData = imread(fullfile(location,file));
            if ~((ismatrix(imageData) || (ndims(imageData)==3 && size(imageData,3)==1)))
                uialert(app.EdgeDetectionComparisonToolFigure,...
                    "Input image must be specified as a 2-D grayscale image or 2-D binary image.", ...
                    "Invalid File");
                return;
            end
        catch
            uialert(app.EdgeDetectionComparisonToolFigure,"Unable to read image file.","Invalid File");
            return;
        end
        app.resetAppOnNewDataLoad(imageData);
    end
end
If the user loads the image from the workspace by selecting the Select option, the app filters workspace variables for potential images and displays the variable names in the drop-down. When the user selects a new image from the workspace, the app resets. The FromWorkspaceDropDownOpening and FromWorkspaceDropDownValueChanged methods define these behaviors.
% Drop-down opening function: FromWorkspaceDropDown
function FromWorkspaceDropDownOpening(app,event)
    % Callback function to filter possible images in workspace and
    % display them in FromWorkspaceDropDown for input selection
    vars = evalin("base","whos");
    supportedClasses = ["int8","uint8","int16","uint16","int32","uint32","int64","uint64","single","double","logical"];
    ValidInputVariables = app.DefaultImportFromWorkspaceDropDownValue;
    for idx = 1:numel(vars)
        entry = vars(idx);
        TF = ismember(entry.class,supportedClasses) && ((length(entry.size) == 2) || (length(entry.size) == 3 && entry.size(3) == 1));
        if TF
            ValidInputVariables(end+1) = convertCharsToStrings(entry.name);%#ok<AGROW>
        end
    end
    app.FromWorkspaceDropDown.Items = ValidInputVariables;
end

% Value changed function: FromWorkspaceDropDown
function FromWorkspaceDropDownValueChanged(app, vent)
    % Callback function to read an image variable from the workspace and
    % load it to the app
    value = app.FromWorkspaceDropDown.Value;
    if ~strcmp(value,app.DefaultImportFromWorkspaceDropDownValue)
        imageData = evalin("base",value);
        app.resetAppOnNewDataLoad(imageData);
    end
    app.FromWorkspaceDropDown.Value = app.DefaultImportFromWorkspaceDropDownValue;
end
Export Detected Edges
Users can export the edge-detected images to files or to the workspace using the Export section of the app toolstrip. In both the To File and To Workspace options, the user can select either one of the edge-detected images to export to a file or to the workspace. The ToFileDropDownValueChanged and ToWorkspaceDropDownValueChanged methods define these respective behaviors.
% Value changed function: ToFileDropDown
function ToFileDropDownValueChanged(app,event)
    % Callback function to write edge-detected image to disk
    value = app.ToFileDropDown.Value;
    switch value
        case "Left Image"
            imageToExport = app.LeftComponent.Image;
        case "Right Image"
            imageToExport = app.RightComponent.Image;
        otherwise
            return;
    end
    filterSpec = app.getSupportedFileFilter(true);
    [file,location] = uiputfile(filterSpec,"Save edge detected image","edgeDetectedImage.png");
    if file~=0
        try
            imwrite(imageToExport,fullfile(location,file));
            uialert(app.EdgeDetectionComparisonToolFigure, ...
                "Edge detected image saved successfully", ...
                "Export Success", ...
                Icon="success");
        catch ME
            uialert(app.EdgeDetectionComparisonToolFigure,ME.message,"Export Failed");
        end
    end
end

% Value changed function: ToWorkspaceDropDown
function ToWorkspaceDropDownValueChanged(app,event)
    % Callback function to write edge detected image to base workspace
    value = app.ToWorkspaceDropDown.Value;
    switch value
        case "Left Image"
            imageToExport = app.LeftComponent.Image;
            assignin("base","edgeDetectedImageLeft",imageToExport);
        case "Right Image"
            imageToExport = app.RightComponent.Image;
            assignin("base","edgeDetectedImageRight",imageToExport);
        otherwise
            return;
    end
    uialert(app.EdgeDetectionComparisonToolFigure, ...
        "Edge detected image saved to workspace successfully", ...
        "Export Success", ...
        Icon="success");
end
Compare Edge Detection Methods Using the App
Run the EdgeDetectionComparisonApp app.
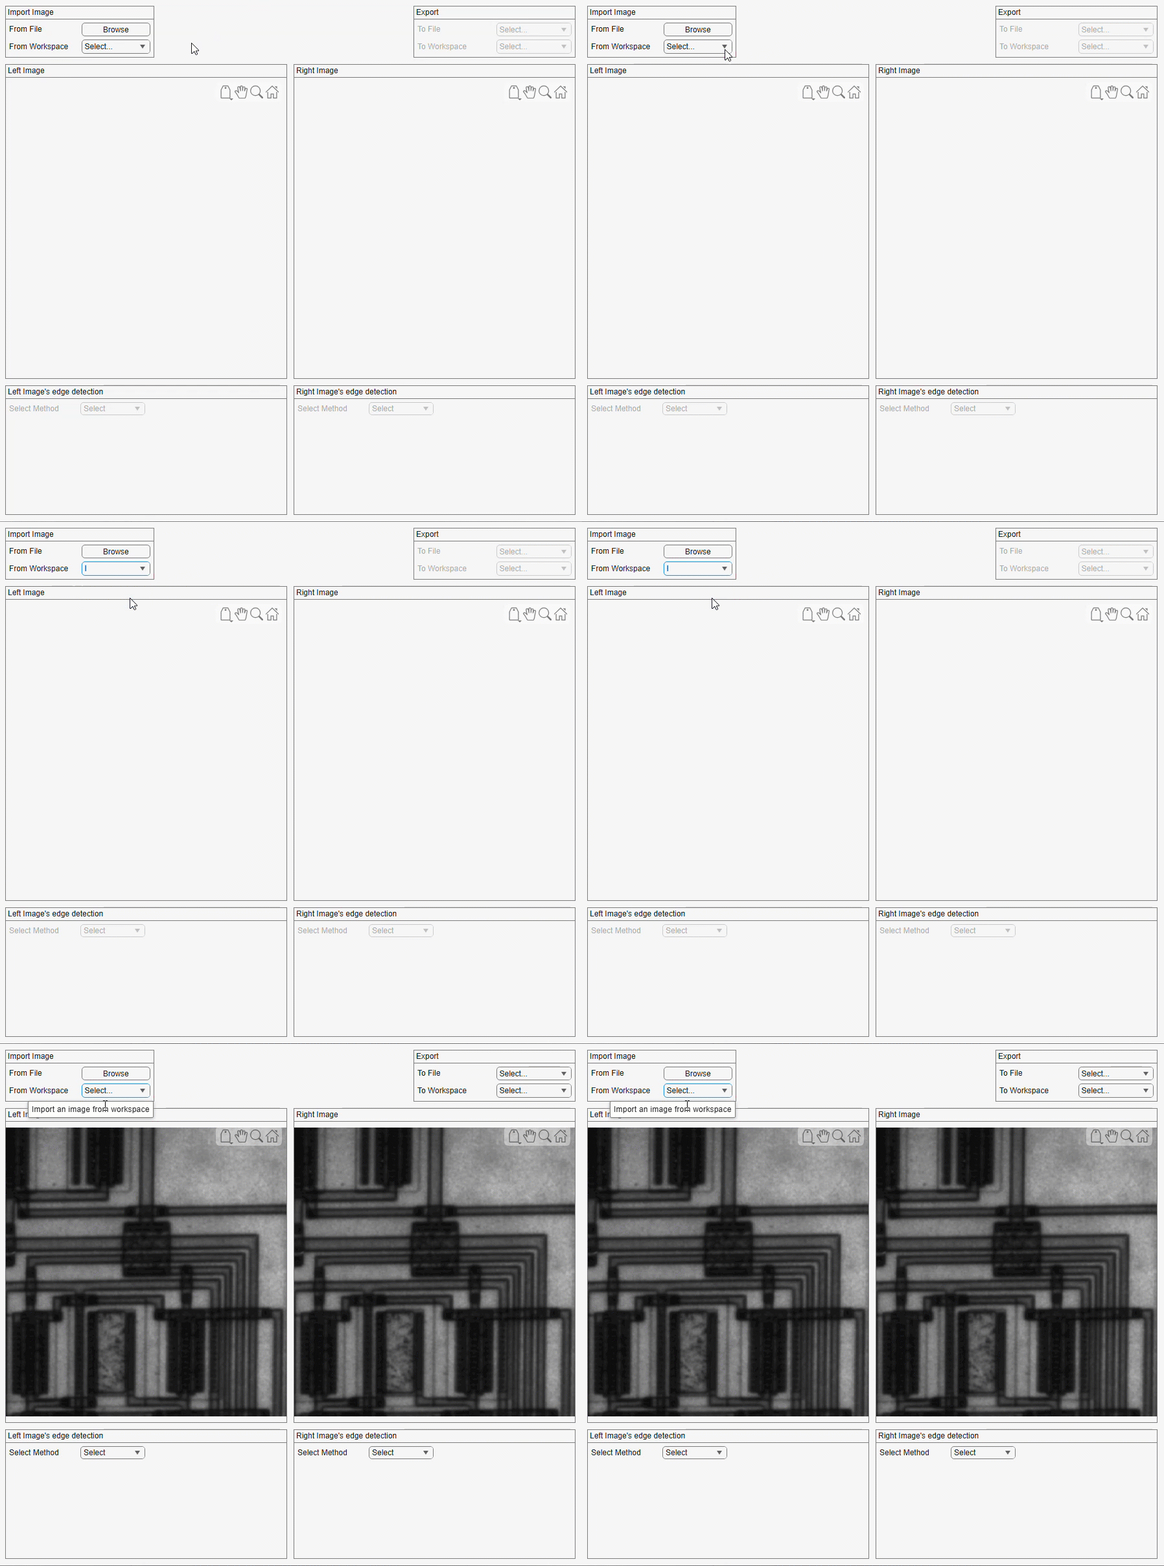
Import an image either from a file or from the workspace using the options in the Import Image section of the app toolstrip. If you choose to import the image from a file, the app opens a dialog box enabling you to browse files that have image file formats. If you choose to import the image from the workspace, the app filters workspace variables for potential images and displays the variable names in the drop-down. When you import an image, the app resets and displays the imported image as both the Left Image and Right Image.
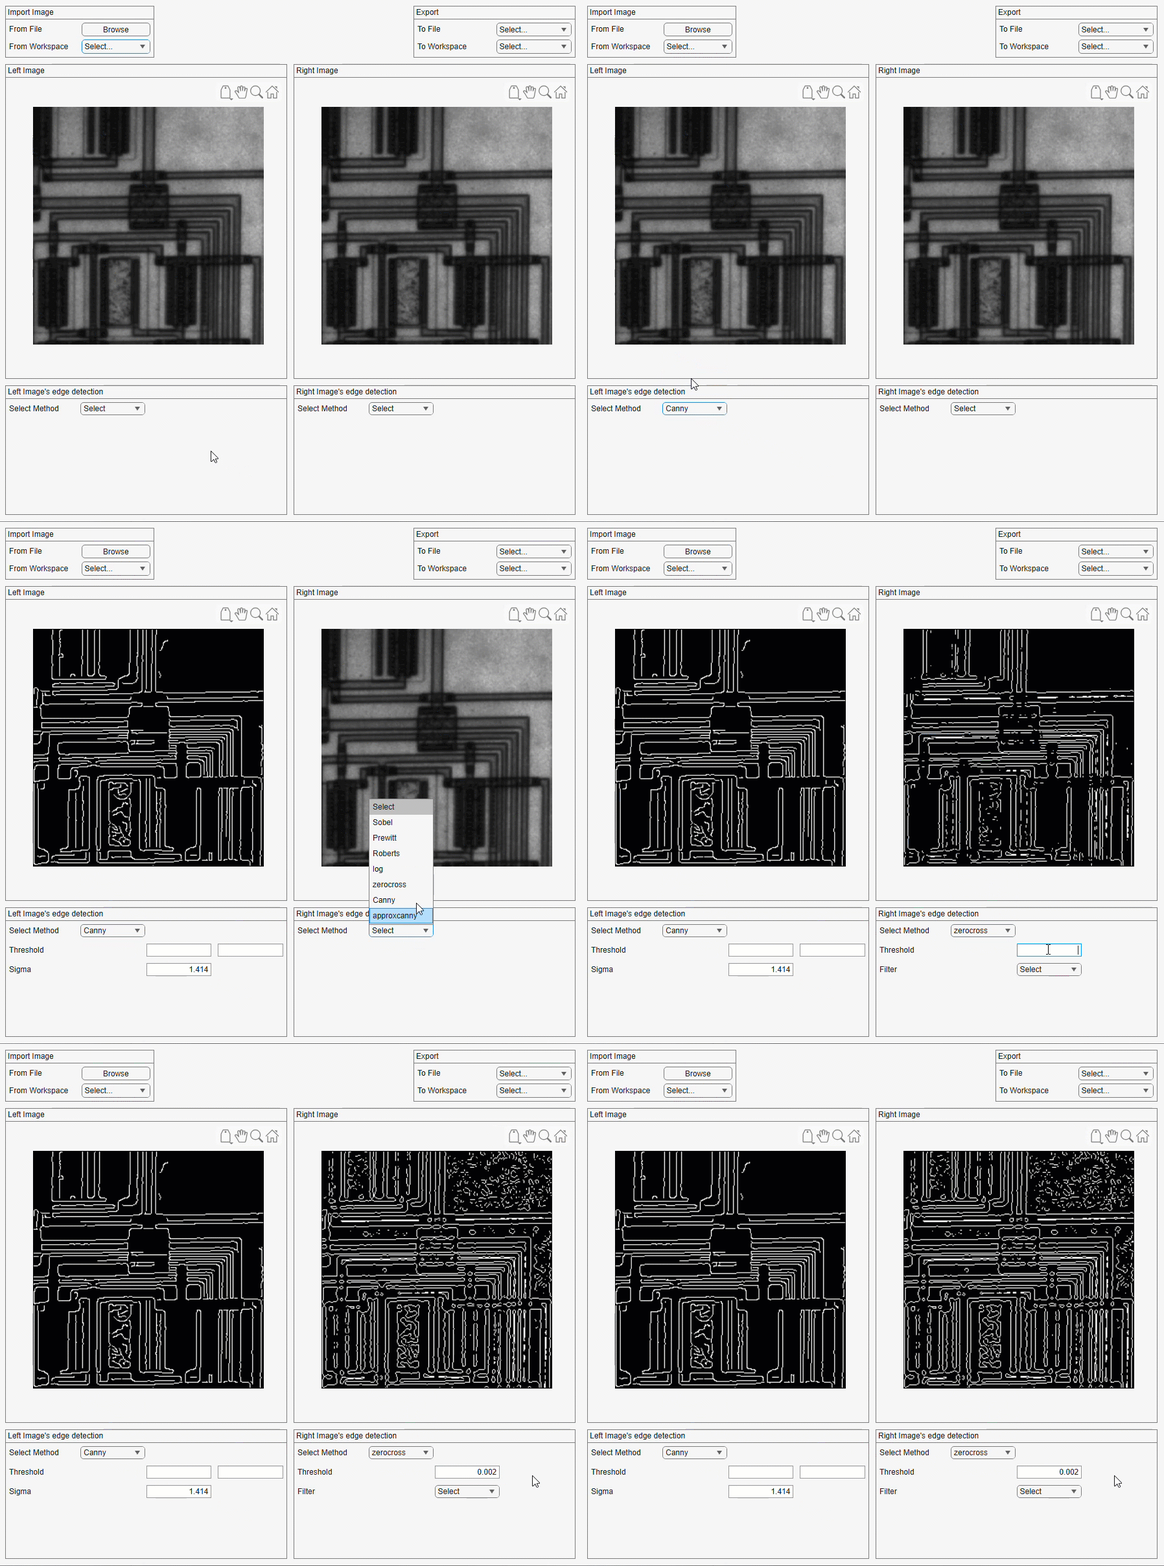
Select edge detection methods for both the Left Image and Right Image from the Left Image's edge detection and Right Image's edge detection sections, respectively. For example, to compare the result of the Canny edge detection and zero-cross edge detection methods on the image, select Canny from the Select Method drop-down for the left image, and zerocross from the Select Method drop-down for the right image. Specify parameters for the left image method. Observe that the left image updates immediately. Similarly, specify parameters for the right image method. Observe that the right image updates immediately.
You can export the results to files or to the workspace. For example, to export the left image to a file, select the Left Image option in the To File drop-down. To export the right image to workspace, select the Right Image option in the To Workspace drop-down.
Customize the App
You can customize the code of the EdgeDetector custom UI component and EdgeDetectionComparisonApp app in the attached supporting files. You can support more edge detection functions by adding them to the list of edge detection methods, adding the UI elements required for their parameters, and adding the corresponding edge detection function call to the update method of the EdgeDetector component. You can also add support for comparing more than two edge detection methods by adding more cells to the grid layout of the app and associating EdgeDetector components with them.
To customize the app, you can choose one of these options:
Open the attached MLAPP files in App Designer and edit the code in the Code View.
Open the attached MLAPP files in App Designer, select Share in the Designer tab and then Export to MATLAB Class (.m), and save the M file. You can then edit the M file.

